
13,696 views ·
16 replies
14k views
16 replies
Plastic in the outer wall at window recess

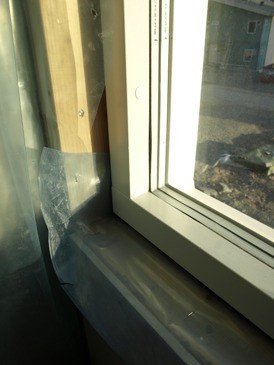
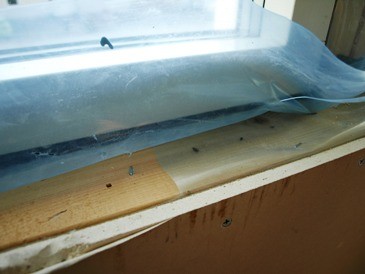
I have reached a stage in decorating the upper floor where it's time to install window recesses and window sills. Behind the adjacent plaster, a blue transparent plastic extends, stapled to the recesses. In order to glue the recesses and window sills (with PL400?), this should probably be removed. Is it just a matter of cutting it away or how should one proceed?
Attaching a picture for clarity. Grateful for any help!
Attaching a picture for clarity. Grateful for any help!

Member
· Uppsala Län
· 389 posts
In my drawings from sjödalshus, it states that the vapor barrier should always be spliced with a certain overlap or taped with approved tape. In general, my drawings indicate that it is important for the vapor barrier to be tight. However, I know that the builders just cut the plastic where it came out between wood and drywall. I am not entirely convinced that this will be completely tight though.
I cut away our plastic, although I did screw on the gypsum reveals, but the window sills were glued/nail down, it's still probably sealed with plastic insulation around the windows so it should be tight anyway...? Anyway, we did it like that and it goes, as you say, hardly good to glue on the plastic.

we have built so-called *environment houses* at work where the plastic is supposed to go into the recess and behind the frame. then it is packed twice with regular packing as well as plastic-coated. then it needs to be sealed all around.. TIGHT. this is advanced but oh well. at home, I plastic-coated past all openings, cut around 10 cm into the opening all around, then angled in all corners. folded in and fastened with hammer tacks. this is usually how it is done, it's enough.. but the soft seal does good.. regards carpenter estwing
Oh, thanks!
However, I'm not entirely sure I understand the meaning. Not particularly knowledgeable in construction, but trying to learn. Do you think you could try explaining for an amateur?
So you had 1 dm of the plastic left which you attached to the jamb (hammertack=staple gun?), placed (glued?) the jambs on top of this (with soft sealant under or around?). Very basic level, please
However, I'm not entirely sure I understand the meaning. Not particularly knowledgeable in construction, but trying to learn. Do you think you could try explaining for an amateur?
So you had 1 dm of the plastic left which you attached to the jamb (hammertack=staple gun?), placed (glued?) the jambs on top of this (with soft sealant under or around?). Very basic level, please
I'm not sure what's right but I cut the plastic flush with the window frame and then insulated with mineral wool against the construction foam that was between the window frame and the wall studs. Then I glued the reveal with PL400 to the stud and sealed with soft caulk against the window + brads. (The reveal on the inside, that is.) I reasoned that the construction foam is tight so any leakage must go through the stud or window frame, so to speak... Hardly optimal but if you ask a carpenter, they'll just say to cut the plastic directly against the stud...
It doesn't seem to be that important when you ask building carpenters.
Edit, I have the plastic inside a 45mm stud and the window frame moved out 37mm so I get 50mm reveals. (37mm + 13mm drywall = 50mm)
It doesn't seem to be that important when you ask building carpenters.
Edit, I have the plastic inside a 45mm stud and the window frame moved out 37mm so I get 50mm reveals. (37mm + 13mm drywall = 50mm)
Last edited:

Most often, the plastic is pinched between the studs, e.g., 145X45 external wall and 45X45 additional insulation... and there we obviously cut the plastic at the reveal... What can happen? And what can we prevent?? I mean, when the plastic is clamped so tightly between, there is no chance for moisture to travel straight through the plastic; instead, it will go through the wood...
So calmly cut the plastic at the window, and glue your window reveal and window sill with PL 400...
So calmly cut the plastic at the window, and glue your window reveal and window sill with PL 400...
I think I'll go with the latest approach. I had the carpenters who built the house over today, and I took the opportunity to ask. They also said I should cut away the plastic to then be able to glue on the trim with PL600 (they always used PL600 instead of PL400). According to them, it was sufficiently tight. Whether it's just pragmatic or correct, I don't know, but I'll go with that option. Sounds simple
Thanks for your tips!
Thanks for your tips!

When I built a house in 2000, the carpenter used plastic-wrapped insulation around the windows, which at least at the time was considered sufficiently vapor-tight. Otherwise, the plastic was cut in the reveals, and now, 8 years later, everything is still in pristine condition. I haven't had any moisture problems or anything like that during this time.
According to the carpenters, 600 was slightly better than 400 because 400 wasn't really suitable for all materials, whereas 600 adhered to almost everything. It's also a bit more expensive. I'm sure there's someone on this forum who has a solid understanding of this.