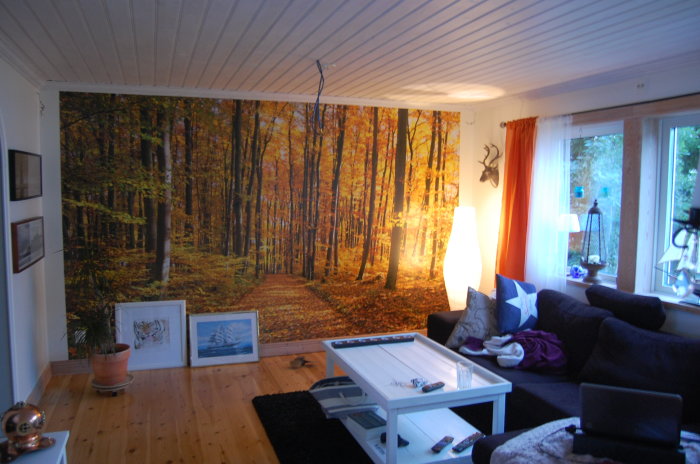
Now it's time to do one last thing in the living room, namely to put wood paneling on one wall. We've already redone the entire living room but kept an accent wallpaper that we weren't sure how it would look. But now we're tired of it and want a bit of a nautical feel, and what better fits than paneling.
The wall will have sawn paneling, leaning towards råspont 20x120 unless I find the boards too narrow. Otherwise, it will be exterior paneling, but then I'll probably have to put windproof fabric on the existing wall so that the accent wallpaper doesn't show through the gaps that will be created. Yes, I want gaps too
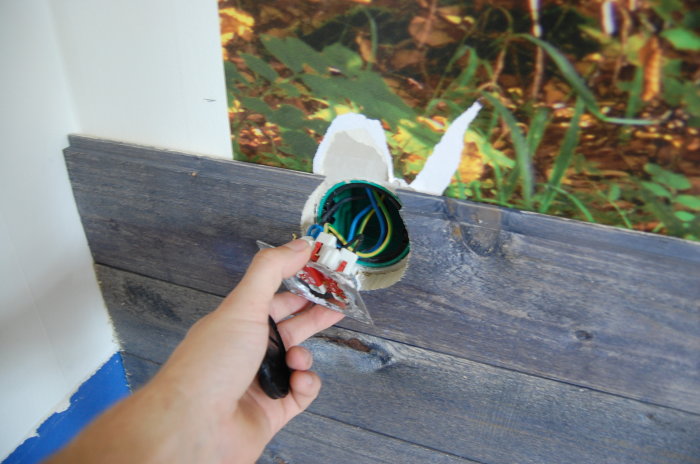
I have 2 electrical outlets on either side and here's what I'm thinking. I guess I have to move them out 20mm because it probably won't look right to notch around them in the boards?
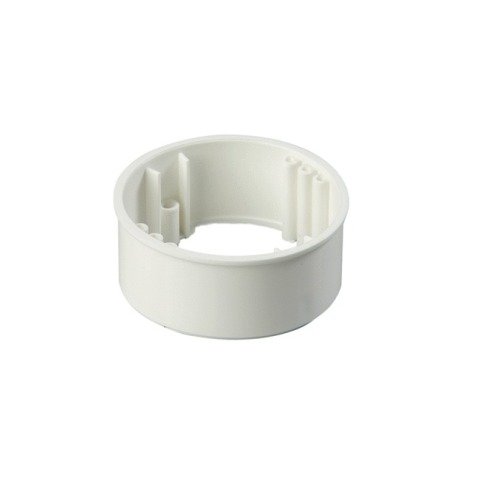
How do I use these spacer rings? I'm really bad with electricity in general, so pictures would be much appreciated.
The paneling will be horizontal and nailed to the wall studs. Then I should be completely sure I'm not nailing into any electrical wires? Since they can't lie flush against the studs?
The wall will consist of paneling 20mm and drywall 13mm, so 60mm brads might be a bit short?
Suggestions are welcome on what you think would be best in terms of wood choice, color, installation, etc.
Right now, it's leaning towards råspont and stained in silver gray, which will be the same shade as driftwood.
Picture of what it looks like now
An extension ring is a plastic ring (available in different heights) that you place on top of the existing electrical box, and then fasten with longer screws in the old one.
Installation pipes with electrical cable may very well be nailed along (on the side of) the framework, but may also be located elsewhere.
If you're unsure here, a detector that indicates where electrical wires are located can be helpful.
Thanks for the info! Now I understand what a distance ring is at least
I borrowed a detector to read yesterday. But it wasn't completely accurate, but I got a hint about how the electricity runs, it seems to go straight up at the outlets all the way to the ceiling.
But even if the pipes are drawn on the side of the studs, I can't possibly nail into them if I only nail into the studs, or am I thinking wrong?
No, normally not. But if it's a weak rule that's not completely straight, and you nail your spikes straight, then...
Normally, the cables are in plastic tubes. If you happen to hit the tube, it usually bends.
What color should I choose for the shiplap?
The whole room is painted in Beckers antique white, and the ceiling is stained with Herdins panel white, fully white.
I'm not entirely sure if the wall should be driftwood colored or a slightly darker tone called tar. Both are stains.
Or paint it white.
The interior style leans towards a coastal theme, and the house is also by the sea, so I want to capture that feeling.
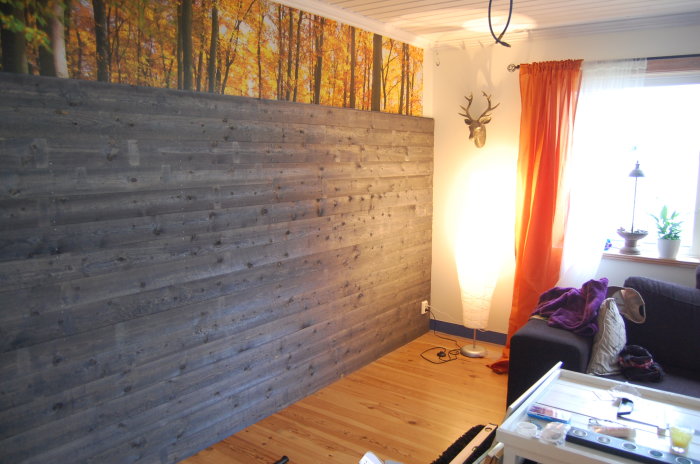
Now it's time to finish this. Finally, I've completed milling the tongue and groove, so tomorrow I should be able to nail it up.
What I'm pondering is the spacer rings for the electrical outlets, do I have to disconnect the electrical cables to fit the ring?
Because as it looks, I can't slide the ring over the junction box, which is square, and then the cables must come out...
Here is what it looks like right now:
I didn't use the spacer ring, just used longer screws into the old box.
Maybe it's not right, but I didn't want to unscrew the cables to fit the ring. But maybe I have to do it anyway. What do you, more electrically knowledgeable people, think?
On these, if I'm seeing the pictures correctly, you don't need to unscrew the cables. They are clamped. I would put the ring there. It shouldn't take more than 5 minutes max. Just turn off the power.
It's probably true that they are clamped because there are no screws to loosen them. However, I don't know how to do it and I would prefer not to touch anything related to electricity
They are still firmly attached to the wall, but oh well.
Fold down the red ploppen, as then you can take a screwdriver and push down a spring-loaded plupp behind it. Push down and pull out the cable. Just make sure to cut the power first! 😃
")