
4,890 views ·
16 replies
5k views
16 replies
How to best fill 1mm to align two boards
Hello
I'm in the process of building a bar/kitchen island with a bunch of strange shapes and claddings; I won't explain all the details at this stage.
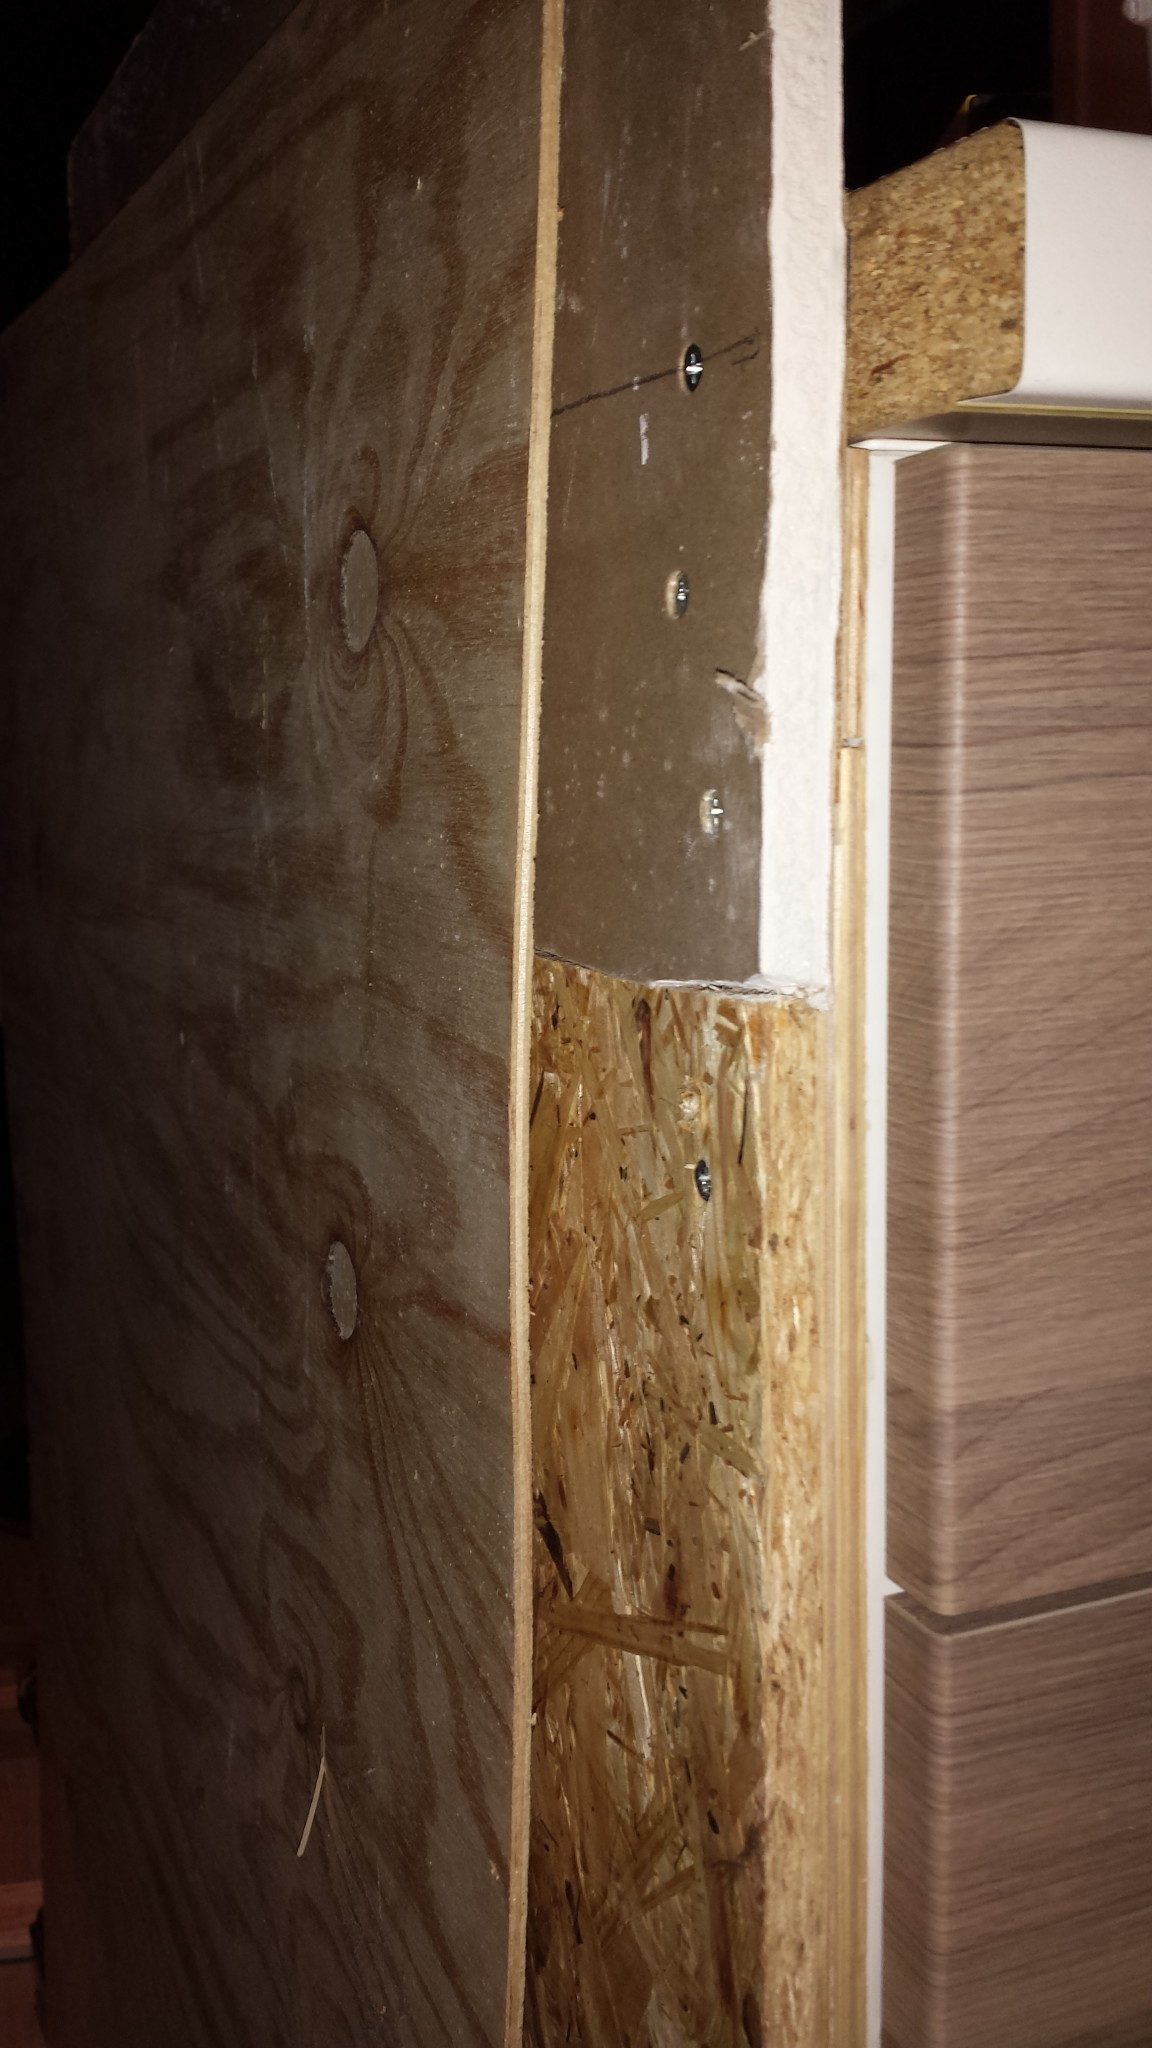
One end of this bar, which is about 110 cm high, has a gypsum board at the top and an OSB board at the bottom, meeting edge to edge. The gypsum board is roughly 1mm thicker than the OSB board. As it feels now, I want it that way, because the upper part will be tiled, and the lower part needs to be strong.
On top of these board layers, plywood will be mounted, then another gypsum board since the outside will also be tiled.
If I attach the thin plywood board (visible in the picture), it will lean a bit or, worse, crack at the joint.
So, for this situation and any other situation where you want to fill out 1mm due to some pesky detail, how do you all handle it? When I build walls, I ignore this kind of thing, but this is more like a piece of furniture.
Should I lay out solid heaps of glue, place newspaper in between like I've seen with floors, or do you have something better? 1mm metal pieces strategically placed?
Thanks for the tips!
The picture is unclear, but we see gypsum on top, OSB below, and a plywood that should be adjacent. The gypsum board is slightly thicker, about 1 - 1.5 mm or something like that.
I'm in the process of building a bar/kitchen island with a bunch of strange shapes and claddings; I won't explain all the details at this stage.
One end of this bar, which is about 110 cm high, has a gypsum board at the top and an OSB board at the bottom, meeting edge to edge. The gypsum board is roughly 1mm thicker than the OSB board. As it feels now, I want it that way, because the upper part will be tiled, and the lower part needs to be strong.
On top of these board layers, plywood will be mounted, then another gypsum board since the outside will also be tiled.
If I attach the thin plywood board (visible in the picture), it will lean a bit or, worse, crack at the joint.
So, for this situation and any other situation where you want to fill out 1mm due to some pesky detail, how do you all handle it? When I build walls, I ignore this kind of thing, but this is more like a piece of furniture.
Should I lay out solid heaps of glue, place newspaper in between like I've seen with floors, or do you have something better? 1mm metal pieces strategically placed?
Thanks for the tips!
The picture is unclear, but we see gypsum on top, OSB below, and a plywood that should be adjacent. The gypsum board is slightly thicker, about 1 - 1.5 mm or something like that.

Thank you for a sensible idea!
Petitess: The gips is probably 12.5 I think?! But sure, 13 is definitely closer than 11.
I can go and buy a 13mm plyfa if it's available at a nearby hardware store. Byggmax only has 12 and 15 (where 12 would also work well).
It's a solution, anyway, a bit troublesome, but worth it if the current situation can't be addressed in any reasonable way.
Are there 1mm spacers available for purchase, by the way? They also solve the problem. I've only seen 2, 5, and 10mm.
Petitess: The gips is probably 12.5 I think?! But sure, 13 is definitely closer than 11.
I can go and buy a 13mm plyfa if it's available at a nearby hardware store. Byggmax only has 12 and 15 (where 12 would also work well).
It's a solution, anyway, a bit troublesome, but worth it if the current situation can't be addressed in any reasonable way.
Are there 1mm spacers available for purchase, by the way? They also solve the problem. I've only seen 2, 5, and 10mm.

Buy a roll of lumpapp and cut out rectangles that are the same size as the osb and build up until you reach the right thickness

spacers are available at Jula https://www.jula.se/catalog/bygg-och-farg/beslag/fonster-dorrbeslag/fonsterbeslag/kilsats-349002/
I would probably have done as Polacoloco suggests and used cardboard
I would probably have done as Polacoloco suggests and used cardboard

I use plastic spacers for all sorts of things where I need to make an adjustment. Like yesterday, I wanted the trim around the new patio door to be perfectly level and plumb. I use the same ones that basseman mentioned above. They are u-shaped and can be "hung on the screw" if you have access from the side. Otherwise, I usually use a small dab of glue to attach them around the screw hole to get the right spacing. It usually works perfectly. But in your case, you might need lots of them. Then it might be better to buy a proper board from the start.
Hope there will be a project thread about this later!
Hope there will be a project thread about this later!
Hello and thanks for all the answers. I revised the idea a bit and skipped the OSB layer, using plaster all the way. There were several situations where spacers were needed, so in some places, I used 2mm (which is the only size I apparently had at home) and produced a lot of spacers and wedges myself. The entire construction is wedge-shaped, so quite a few wedges are needed.
Here you can see what I'm working on:
https://www.facebook.com/etthundratolvan
Thanks for the thoughts, I'll get back when I get stuck next time.
Here you can see what I'm working on:
https://www.facebook.com/etthundratolvan
Thanks for the thoughts, I'll get back when I get stuck next time.
After I applied the plaster, there was a layer of plywood, then a layer of plaster on the outside, and now the tiling is also done. A little fine-tuning is left, but it's starting to take shape.
By the way, I went to Jula and bought a package of spacers similar to the ones f91jsw linked to. Really good to have.

It's decorative stone from Dekora. A nightmare to get everything right, which included mitering these stones at the corners. But it turned out quite well. Think of all the wedges, spacers, and stuff that's behind there.
By the way, I went to Jula and bought a package of spacers similar to the ones f91jsw linked to. Really good to have.
It's decorative stone from Dekora. A nightmare to get everything right, which included mitering these stones at the corners. But it turned out quite well. Think of all the wedges, spacers, and stuff that's behind there.