
26,302 views ·
24 replies
26k views
24 replies
How to attach ceiling molding to a suspended gypsum ceiling & brick wall?
Hello,
I have lowered the ceiling with metal studs to conceal electrical work and install spotlights. I placed 13 mm plasterboards against the studs.
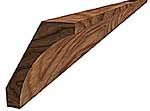
Around the ceiling, I am planning to put up simple ceiling moldings, so-called coving (see attached image).
Some of the walls are wood paneling, and then you can just nail through the molding into the wood wall.
The question is how to attach these to the walls that are plastered brick, it's hard to nail anyway.
And gluing to the plasterboard is probably a bad idea if the wood molding moves. I've heard you shouldn't nail into plasterboard.
Do you think nail plugs, like horizontally through the wood molding into the brick wall, would work?
And if so, which drill do you use for nail plugs, since you typically drill right through the molding and wall and then nail in the nail plug. The SDS drill in the hammer drill likely won't go through the wood molding right away. Would a wood drill work to make a hole for the nail plug in the brick?
Best regards,
Alko
I have lowered the ceiling with metal studs to conceal electrical work and install spotlights. I placed 13 mm plasterboards against the studs.
Around the ceiling, I am planning to put up simple ceiling moldings, so-called coving (see attached image).
Some of the walls are wood paneling, and then you can just nail through the molding into the wood wall.
The question is how to attach these to the walls that are plastered brick, it's hard to nail anyway.
And gluing to the plasterboard is probably a bad idea if the wood molding moves. I've heard you shouldn't nail into plasterboard.
Do you think nail plugs, like horizontally through the wood molding into the brick wall, would work?
And if so, which drill do you use for nail plugs, since you typically drill right through the molding and wall and then nail in the nail plug. The SDS drill in the hammer drill likely won't go through the wood molding right away. Would a wood drill work to make a hole for the nail plug in the brick?
Best regards,
Alko

Found through an older post here (use the search function) a good American site about how to install crown molding, especially focused on the art of making nice corner cuts.
But it also advised that in a case like yours, first install a triangular strip that fits neatly inside your crown molding (should have a 1-2mm gap), and then nail or screw the crown molding into the triangular strip. It has worked perfectly for me.
But it also advised that in a case like yours, first install a triangular strip that fits neatly inside your crown molding (should have a 1-2mm gap), and then nail or screw the crown molding into the triangular strip. It has worked perfectly for me.
Thanks for the response! I'll look for that other thread, juast gerning is a bit tricky, and I'm not among those who happily fill 15mm gaps with latex 
Regarding your special method - doesn't that just move the problem? I mean, how do you attach the triangular molding to the ceiling/wall in the case of plaster/brick+gypsum board?
Best regards,
Alko
Regarding your special method - doesn't that just move the problem? I mean, how do you attach the triangular molding to the ceiling/wall in the case of plaster/brick+gypsum board?
Best regards,
Alko
You can then choose to only attach the triangle strip to the surface that is easy to attach to (the ceiling if you find the beams). Alternatively, you can attach it a bit more robustly with nail plugs or similar to the wall. It doesn't matter how it looks in the triangle strip.
I only attached it to the ceiling on the walls that were plastered (only about 3m out of 25).
I had a fairly wide concave moulding, 71mm, which allowed for a reasonably large triangle strip behind it.
If I remember, I will see if I can link the page here later this evening. I don't have the link on this computer.
I only attached it to the ceiling on the walls that were plastered (only about 3m out of 25).
I had a fairly wide concave moulding, 71mm, which allowed for a reasonably large triangle strip behind it.
If I remember, I will see if I can link the page here later this evening. I don't have the link on this computer.
If I were you, I would glue with PL 400 or PL 600 and use some props to press the molding against the corner. If you try to pre-drill and plug, it takes infinitely much longer than fixing some suitable props to press the molding with. Furthermore, the molding does not move after you have painted, meaning you get a lasting nice paint job even after a few years as the molding will stay secure and not move once it has dried. It gets a little messy while you're working, but it turns out much better than trying to nail into a metal stud. Additionally, there is less filling work. Biltema has cheap extendable props that can easily be made longer. They work well for such work. PL 400 is advantageously used for all casing and molding as the paintwork later doesn't separate and crack. You just have to think about where to place the blobs of glue so the wood can move in the right direction, i.e., towards the wallpaper side or latex side if desired.
Good luck
Jerk
Good luck
Jerk

I would have gone with Hempularen's variant, with a triangular strip.
Just as he says, attach the triangular strip with whatever you want. You should be able to screw it into the wall studs, because they can't be that hard to find.
Then attach the ceiling moulding with brads, it will be great.
Nail plugs will NOT look good through the ceiling moulding!
Good luck
Just as he says, attach the triangular strip with whatever you want. You should be able to screw it into the wall studs, because they can't be that hard to find.
Then attach the ceiling moulding with brads, it will be great.
Nail plugs will NOT look good through the ceiling moulding!
Good luck
Thanks for the answers!!
I thought it sounded great when I read about Jerk's gluing options (where can you find PL400?), since time is a factor, and I don't see the need to remove the crown molding without the ceiling being demolished as well.
The problem with the triangular molding is that I've recessed with primary/secondary battens (without a wall rail to speak of), so there aren't many battens to attach to, and the wall is mostly plaster as mentioned. In a wooden wall, it would be perfect, but then I could just as well nail the crown directly.
What do Naresjö and Hempularen say, is glue not good? I can imagine that warped moldings can be a problem when gluing and molding-wall/ceiling should lie completely without gaps, but maybe the Biltema supports fix that...
/Alko
I thought it sounded great when I read about Jerk's gluing options (where can you find PL400?), since time is a factor, and I don't see the need to remove the crown molding without the ceiling being demolished as well.
The problem with the triangular molding is that I've recessed with primary/secondary battens (without a wall rail to speak of), so there aren't many battens to attach to, and the wall is mostly plaster as mentioned. In a wooden wall, it would be perfect, but then I could just as well nail the crown directly.
What do Naresjö and Hempularen say, is glue not good? I can imagine that warped moldings can be a problem when gluing and molding-wall/ceiling should lie completely without gaps, but maybe the Biltema supports fix that...
/Alko
PL 400 can be found at most hardware stores. Bauhaus has both PL400 and PL600. PL600 has a shorter drying time than 400 but is probably otherwise the same thing. Once you have the moldings in place, you won't be able to remove them once the glue has dried, except that the moldings or the plaster will break.
Good luck
Good luck
Personally, I would NOT have glued the moldings.
Several reasons, the first being I am not a pro at this, so I want something as "forgiving" as possible.
I can only imagine what could go wrong, from experience I found it damn hard to nail up these long moldings, how is it not then to glue it...
The molding comes against the wallpaper, and oops, you have glue on the wallpaper...
If you're not really satisfied, you can take down the molding, but not with glue.
Then you need to apply pressure on the molding for it to stick.
Sure, you might handle this excellently, then congratulations!
But I would never manage it, because I know MY limitations.
No, I would have installed a triangular molding; you have wall studs, pre-drill horizontally through the molding and screw into the stud. If you need to fasten where there's only plaster, plug or use "metal screws" (there are some that are thickly threaded and then you use a normal screw in, don't know what these are called) and then I would have attached your molding, simple and FORGIVING.
Fits me like a glove.
Good luck!
Several reasons, the first being I am not a pro at this, so I want something as "forgiving" as possible.
I can only imagine what could go wrong, from experience I found it damn hard to nail up these long moldings, how is it not then to glue it...
The molding comes against the wallpaper, and oops, you have glue on the wallpaper...
If you're not really satisfied, you can take down the molding, but not with glue.
Then you need to apply pressure on the molding for it to stick.
Sure, you might handle this excellently, then congratulations!
But I would never manage it, because I know MY limitations.
No, I would have installed a triangular molding; you have wall studs, pre-drill horizontally through the molding and screw into the stud. If you need to fasten where there's only plaster, plug or use "metal screws" (there are some that are thickly threaded and then you use a normal screw in, don't know what these are called) and then I would have attached your molding, simple and FORGIVING.
Fits me like a glove.
Good luck!
Don't be intimidated. You place the molding on site after cutting it to the right length and checking that the miter is good. Then you lift the molding into place using the supports. After that, apply small drops of glue on the edge of the molding against the ceiling about 1 cm onto the molding with the help of a glue gun. Then press it with the grip that sits on the support so that the molding is pressed against the ceiling while adjusting it correctly. It's as easy to get this right as standing on a ladder with one elbow against the molding, trying to hold with the other hand and holding the nail with the third... whatever that may be. If you don't have a brad nailer, I recommend gluing with the help of Biltema's ceiling support.
A huge thanks to naresjö and hempularen for tips on the corner molding, and I really recognize naresjö's description of how things can go wrong even though it sounds so simple when you're an amateur. It's those details, like the glue dripping off the molding when you flip it up towards the ceiling, that you forget in planning and that take so much damn time and energy to work around.
I'm still going to try jerks' glue-variant. I had a carpenter over yesterday who built a balcony railing, and he said PL400 is great for just moldings. My problem is that I can't reach any beams to nail the molding to; I only have hat profiles that are maybe 10 cm from the wall, with the drywall attached to them.
My alternative to glue is to screw plug the ceiling molding into the plastered wall, and that's not so easy with thin cove molding.
I'll try glue (though only against the drywall ceiling, with a few spots on the wall, in case I want to tear it down someday), and if it doesn't work, I'll screw (plug) the corner molding against the plaster wall, then attach the cove molding with finishing nails against the corner molding. Should work well too, I think!
Jerk, how do you mean when you write...
"PL 400 is preferably used for all lining and molding as the painting work later does not dry apart and crack. You just have to think about where to put the glue spots so the wood can move in the right direction, i.e., towards the wallpaper side or latex side if you wish."
Can you glue the cove mainly to the ceiling (I will never take down the molding without tearing down the ceiling, I think) with a few spots on the wall, or will it come off if it moves (plastered brick house, should be steady)?
And how do you mean that the painting doesn't dry apart, what does that have to do with gluing??
Best regards/
Alko
I'm still going to try jerks' glue-variant. I had a carpenter over yesterday who built a balcony railing, and he said PL400 is great for just moldings. My problem is that I can't reach any beams to nail the molding to; I only have hat profiles that are maybe 10 cm from the wall, with the drywall attached to them.
My alternative to glue is to screw plug the ceiling molding into the plastered wall, and that's not so easy with thin cove molding.
I'll try glue (though only against the drywall ceiling, with a few spots on the wall, in case I want to tear it down someday), and if it doesn't work, I'll screw (plug) the corner molding against the plaster wall, then attach the cove molding with finishing nails against the corner molding. Should work well too, I think!
Jerk, how do you mean when you write...
"PL 400 is preferably used for all lining and molding as the painting work later does not dry apart and crack. You just have to think about where to put the glue spots so the wood can move in the right direction, i.e., towards the wallpaper side or latex side if you wish."
Can you glue the cove mainly to the ceiling (I will never take down the molding without tearing down the ceiling, I think) with a few spots on the wall, or will it come off if it moves (plastered brick house, should be steady)?
And how do you mean that the painting doesn't dry apart, what does that have to do with gluing??
Best regards/
Alko
Good luck Alko, feel free to write and tell us how you, as an "amateur," felt about using PL400. Who knows, maybe I'll change my mind on the matter...
But as Addee wrote, putting up battens beforehand so you have something to attach, for example, the ceiling molding to, that's the kind of thing you forget as an amateur... SUCK!!
But as Addee wrote, putting up battens beforehand so you have something to attach, for example, the ceiling molding to, that's the kind of thing you forget as an amateur... SUCK!!
Really, I could have set some 45*45s, let the metal-primary rules rest on these. Would have killed two birds with one stone (easier to set the molding + support for primaries). Annoying! But well, now I have to bite the sour apple, or the bitter PL400
/Alko
/Alko

Gluing the triangular strip and then nailing the crown molding to the triangular strip with a brad nailer must be the best way, right?
By the way, you only miter outer corners, not inner corners.
Here is the link I gave to the handyman a couple of years ago:
Installing Crown Molding | Homeowner's Handbook | THIS OLD HOUSE
By the way, you only miter outer corners, not inner corners.
Here is the link I gave to the handyman a couple of years ago:
Installing Crown Molding | Homeowner's Handbook | THIS OLD HOUSE