67,873 views ·
7 replies
68k views
7 replies
How to make the floor/threshold look nicest?
I'm wondering how to make the transition between the threshold and the floor look nice.
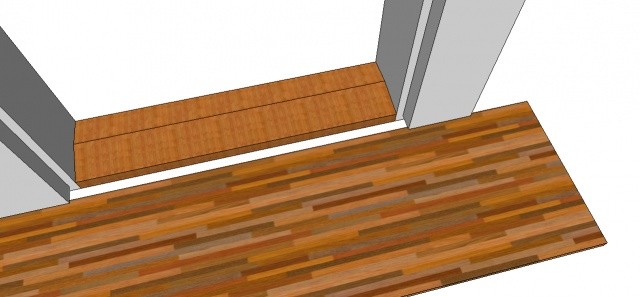
When installing flooring, there should be an expansion gap around the entire floor, even at the threshold. So there will be a gap that needs to be covered in a good way. See image.
If you want to cover the gap with the yellow piece I have drawn in, how do you best attach it to the threshold? Should you glue it to the threshold?
Or do you have other tips?
Otherwise, you can let the floor go under the threshold and door frames.

If you want to make the work simple, lay the parquet board parallel to the threshold. Without gaps and without molding. That's what I did in two different rooms. In one room, there were no problems at all. In the other room, it creaks a bit in the summer when you step near the threshold because wood expands when it gets more humid. I'm still satisfied and it looks perfectly fine.
If you want the floor to appear original and not added later, you should do like magnu. He placed the expansion joint under the door frame and then let the floor extend under the threshold. That work is considerably more difficult.
If the parquet boards are laid perpendicular to the threshold, a molding is needed unless you do like magnu.
I would lift the threshold, then plane away a bit of the frame if the floor doesn't go under it, then lay the floor under the frame. Leave a 2 cm gap between each floor, reattach the threshold, possibly make a new threshold, then saw the bottom edge of the door to match the new height of the threshold.
Best regards
Best regards
That's what I did in the first bedroom. I sawed out the frame to fit the floor. The engineered parquet was laid perpendicular to the threshold. It was easy to tuck the parquet board under the first door frame, but when I got to the second door frame, it was physically impossible to get the parquet in—I had to disassemble the frame to fit the parquet.CSF said:I would raise the threshold, then plane away a bit of the frame if the floor doesn't go under, then put the floor under the frame. Leave a 2 cm gap between each floor, put back the threshold, possibly make a new threshold, then saw the door at the bottom edge according to the new height of the threshold.
Best regards
If you have a somewhat modern house with door frames that are screwed and relatively easy to dismantle, it's not too much work. You might need to repaint the moldings afterward to make it really nice. However, if you have a house where it's not entirely clear how to remove the frame, you should probably use smyglister.
I have installed new flooring in my hallway. There is a bathroom where I couldn't remove the frame and threshold. What I did here was arrange an insert in the threshold, which covered the entire part where the door leaf goes in and extends a bit over the floor. Then I also had to saw a bit off the door.
For the laundry room, where the threshold is slightly higher compared to the floor, I nailed a quarter round molding.
For the kitchen floor, I have a level difference. Here I made a new threshold, starting with a threshold piece from Bauhaus. Then I combined it with a brass leveling strip.
For the laundry room, where the threshold is slightly higher compared to the floor, I nailed a quarter round molding.
For the kitchen floor, I have a level difference. Here I made a new threshold, starting with a threshold piece from Bauhaus. Then I combined it with a brass leveling strip.
Click here to reply