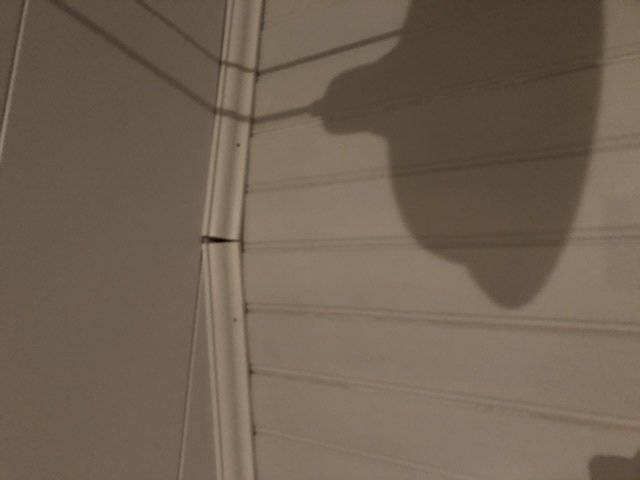
Hi, it went perfectly well to cut and attach the trim except when I got to this point? I have twisted and turned, cut various ways with a miter saw, angled and tilted in different places, different degrees, etc., but NO... I don't know how I can solve it. An alternative is to cut out a wedge and insert it, then fill it a bit. But I wonder if it's possible to cut so the trim overlaps the other or they join without needing to insert a wedge?
Just a tip that many "real" measuring sticks offer the ability to measure angles with printed degrees on them. Perhaps it's questionable to suggest this, but it's hard to justify (for some) purchasing a tool to measure a single angle.
I have both a bevel and an adjustable angle gauge and have used them, I certainly know what angle it became but I don't know how to cut at a 10% angle, and the molding is this type https://www.beijerbygg.se/privat/sv...-furu-15x56mm-allmoge-vit-l-4-2m-866201505642
The first molding from the wall is straight, it's the second molding that needs to fit in, or do both need to be cut in a certain way??? I've watched various videos but can't find just that version.
I have both a miter gauge and an adjustable angle measurer and have used them, sure I know what angle it became but I don't know how to cut a 10% angle and the trim is this type [link]
The first trim from the wall is straight, it's the second trim that needs to fit in, or both need to be cut in a certain way??? I've watched different videos but I can't find that specific variant.
You need to cut both at the same angle, otherwise the cut surfaces will be different sizes and therefore not fit.
I can only suggest that many "real" rulers provide the possibility to measure the angle with printed degrees on them.
Maybe it's inadvisable to suggest this, but it's hard to justify (for some) purchasing a tool to measure just one angle.
You must cut both at the same angle, otherwise the cut surfaces will be different sizes and therefore won't fit.
I think I've tested that, but can try again.
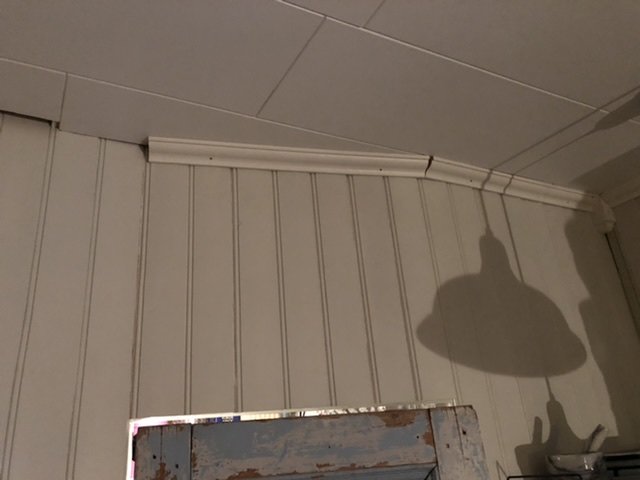
The trim is not completely against the wall, leaving a small gap behind it, when I cut them at a 10-degree angle they didn't fit together. Hard to explain but I'll test again today so we'll see how it turns out.
Swan neck/cove moldings easily invite the trial and error method. They can be tricky at times, and even the most experienced carpenter gets them wrong occasionally. Just keep at it, saw small test pieces until it works.
One green-marked surface against the bottom on the miter saw, the other against the vertical part, essentially holding the molding as it should sit in reality.
[image]
If there are two angles, where both the wall & ceiling deviate, it becomes a bit different.
Edit:
Both moldings must be cut, hence the half angle.
Exactly what I mean, so I should set the miter saw to a 5-degree angle? I've taped on the saw and drawn lines how the molding should lie when I cut, the same as it lies against the wall and ceiling.
If the wall angle is 190° then the miter saw should be set to (190/2)-90=5°
If the wall angle is 170° then the miter saw should be set to (190/2)-90=-5°
If it's the right piece to be cut, place it to the right of the saw blade and move the saw to the left when there is a positive angle.
If the wall angle is 190°, set the miter saw to (190/2)-90=5°.
If the wall angle is 170°, set the miter saw to (170/2)-90=-5°.
If it's the right piece to be cut, place it to the right of the saw blade and move the saw to the left when the angle is positive.
[image]
Ok, I cut 10 degrees and -10.
So now I'm going to try 5 and -5.
Take two pieces of molding that are just cut straight and hold them in place.
Measure the gap between them (e.g., 12mm).
Then each molding should be half the gap from perpendicular (in the example, 6mm from perpendicular).
Vi vill skicka notiser för ämnen du bevakar och händelser som berör dig.


Demmpa said:
One green-marked surface against the bottom on the miter saw, the other against the vertical part, essentially holding the molding as it should sit in reality.
