4,621 views ·
30 replies
5k views
30 replies
Concrete for refilling around pipes in shower room
I need to fill in a shower room where we have rerouted pipes. For the pipes, openings were made in the base layer of coarse concrete, and since today, I've removed the finish layer down to about 7-8 cm below the original floor surface/concrete surface.
I want to fill with EPS concrete for the part that was the fine layer, but I assume I need to pour coarse concrete for the coarse layer (the first 10-12 cm)?
What do you think? Waiting time is not an issue for me.
View attachment 531368
I want to fill with EPS concrete for the part that was the fine layer, but I assume I need to pour coarse concrete for the coarse layer (the first 10-12 cm)?
What do you think? Waiting time is not an issue for me.
View attachment 531368

Why should you fill with coarse concrete first? If you have plenty of time to dry before laying the floor, you can cast everything with regular coarse concrete. Otherwise, I would have filled with EPS concrete and then used self-leveling compound on top of that.
If the concrete slab has something to do with the construction, it's easiest and safest to use the same product as before, e.g., coarse concrete.KJD said:
Need to fill in a shower room where we have rerouted pipes, for the pipes it has been taken up in the base layer of coarse concrete, and today I have layered off the fine finish and come down about 7-8 cm below the original floor surface/concrete surface.
Want to fill up with EPS concrete for the part that was fine finish, but I assume I have to cast coarse concrete for the base layer (first 10-12 cm)?
What do you say? Waiting time is not a problem for me.
[media]
You should then see reinforcement. You might even have cut off reinforcement that needs to be supplemented?
If it's just a layer of concrete, you can use e.g., EPS. Or you can use e.g., Weber 318.
There are naturally more options.
Tap around on the old screed to make sure it's not hollow anywhere. If it is, it should also be removed before casting.
No reinforcement at all in the slab, but so-called "voter" under the outer walls (and here an outer wall corner), so I guess I need to use coarse concrete/construction concrete? I consider EPS as "reinforced" styrofoam in construction strength.
I have used fast-setting concrete before, but I'm worried that the curing process is difficult to succeed with. It should be enough to use coarse concrete up to the low level, and then, for example, EPS. I would have liked to level off and lay XPS, but I don't understand how platon should be ventilated in wet areas.
I have used fast-setting concrete before, but I'm worried that the curing process is difficult to succeed with. It should be enough to use coarse concrete up to the low level, and then, for example, EPS. I would have liked to level off and lay XPS, but I don't understand how platon should be ventilated in wet areas.
Fill up with for example. Pipe trench gravel. Cast the grooves again with for example. Weber 318. Cast about as thick as the slab is today. Don't forget primer on the edges. If the edge beam is completely chipped off, you may need to drill in some reinforcement. But 318 is good enough even for the edge beams. After 1-2 days you can use eps if you feel like it. Otherwise, you continue with 318. I don't know how high you will cast, but you can put some Styrofoam at the bottom if the height allows. You have an open time of 30-40 min so that little work shouldn't be a problem. You don't need a perfect casting since you'll probably do a leveling screed afterwards.No reinforcement at all in the slab, but so-called "voter" under the outer walls (and here an outer wall corner), so I guess I need to use coarse concrete/construction concrete? I regard eps as "reinforced" Styrofoam in construction strength.
I have used quick-setting concrete before, but I'm worried that the curing process is difficult to succeed with. It should still be enough to use coarse concrete up to the low level, and then for example eps. I would have liked to level off and put xps, but I don't understand how Platon should be ventilated in wet areas.
So it's possible to pour eps on top of the coarse concrete that early? But what happens when you float later?Krille-72 said:
Fill up with, for example, Rörgravsgrus. Pour over the trenches with, for example, Weber 318. Cast about as thick as the layer is today. Don't forget primer on the edges. If the edge beam is completely chipped off, you might need to drill in some reinforcement. But 318 works well for the edge beams too. After 1-2 days, you can do eps if you feel like it. Otherwise, continue with 318. I don't know how high you're going to cast, but you could place some polystyrene at the bottom if the height allows. You have an open time of 30-40 minutes, so that little bit should not be a problem. You don't need a perfect casting because you'll probably want to float a slope on top afterwards.
I would have actually wanted to lay platon and ventilate everything, so I could use xps.
No, not above the rough concrete unless you put plastic at the bottom. I'm talking about, for example, Weber 318, which is a coarse fast-setting compound.
Oh, what do you see that's deviating? It's a company that installed this, according to them they follow Säker Vatten. What I know is that the water taps can't be on the outer wall, they need to be moved to the installation layer. There are also 90C pipe bends at some places, which we have noted.S simmeboy said:

It is not the tap that should not be attached to the outer wall, it's the pipes to the tap. But it's okay with an outer wall as long as there's more insulation on the outside than on the inside. The pipes will then stay warm.
But from the picture, I don't understand the drainage layout. It looks strange.
But from the picture, I don't understand the drainage layout. It looks strange.
H hempularen said:It's not the tap that shouldn't be on the outer wall, it's the pipes to the tap. But it's OK with the outer wall as long as there's more insulation towards the outside than towards the inside. The pipes will then stay warm.
But from the picture, I don't understand the drainage layout. Looks strange.
"But it's OK with the outer wall as long as there's more insulation towards the outside than towards the inside. The pipes will then stay warm."H hempularen said:It's not the tap that shouldn't be on the outer wall, it's the pipes to the tap. But it's OK with the outer wall as long as there's more insulation towards the outside than towards the inside. The pipes will then stay warm.
But from the picture, I don't understand the drainage layout. Looks strange.
That was a bit of strange advice when talking about Säker Vatten.
The pipes should be on the warm side against an outer wall. If you want the pipes according to Säker Vatten and hidden, you need to build a false wall.
If you take some better and more pictures and explain what's considered the outer wall, the thread might be able to determine whether the installations follow 'Säker Vatten' or not.oh, what do you see that's unusual? It is a company that installed this, according to their statement they follow 'säker vatten'. What I know is that the water faucets cannot be placed in the outer wall, they have to be moved to the installation layer. There are also 90-degree pipe bends in some places, which we have noted.
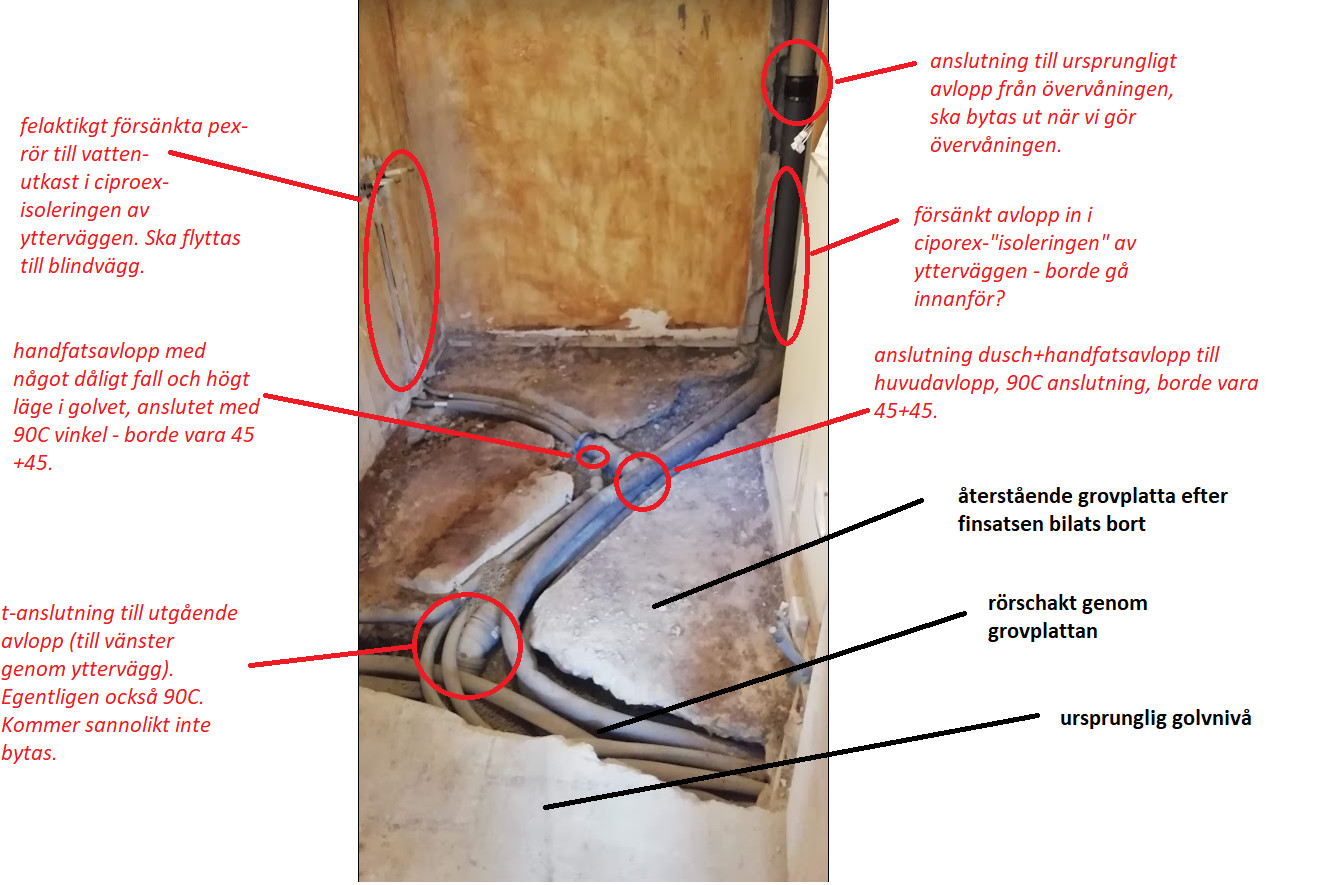
I'll see what more I have in the picture wall.
But I have control over the wall, we're going to build an "installation layer" (or blind wall) to secure it, as the wall is ciporex elements used as "insulation" according to the original drawings. If there are discussions that are crystal clear here, it's definitely interesting.
Then it's the same with the drain pipe in the wall going up - which probably also shouldn't be in the "insulation," but it would steal so much space it feels a bit painful to have to move it, but sure, it probably should also be in a conduit. I'd gladly listen to ideas on that. (Currently, the old drain meets the new one roughly in the middle of the wall with a rubber coupling, which will be replaced when we change the pipes up to the entrance level).
There are also some bends that are 90 degrees, which will become 45+45.
Was there anything else that @simmeboy, or others, saw as faults in the drain installation that I'm interested in?
Could you specify more exactly what looks strange, it would be interesting to hear.
Last edited:
attaching my comments on what feels relevant to me at the moment.shall see what more I have in the picture wall.
but the wall I have under control, we will build an "installation layer" (or false wall) to secure it, as the wall is ciporex elements used as "insulation" according to the original drawing. If there are any arguments that are crystal clear here, it is indeed interesting.
Then again, it's the same with the drain pipe in the wall up - which also probably can't be in the "insulation," but it would steal so much space, so it's a bit painful to have to move it, but sure, it probably should also be in a drum. I'm open to ideas on that. (Currently, the old drain meets the new one about halfway up the wall with a rubber coupling, which will be replaced when we change the pipes up to the entrance level).
There are also a few pipe bends that are 90 degrees but should be 45+45.
Was there anything else that @simmeboy, or others, saw as defects in the drain installation that I would be interested in?
If you could specify more precisely what looks strange, it would be interesting to hear.