As I mentioned in my renovation thread - https://www.byggahus.se/forum/threads/terom-renoverar-och-star-i.283451/page-2#post-2583242 - I have a horizontal 120 stud that supports the beams of the garage roof. That stud is nailed to the wall studs against the house and is in the way. I was able to remove part of it when I opened up for a sliding door, but now I'm looking at whether I can remove the rest as well.
I can't insert a stud sideways from the inside, but I can from underneath. So, the idea is whether it's possible to insert a 145 stud into the standing house wall studs and place, fix with angle brackets/nail plates, a 200 beam piece on this that the garage roof beams, about 3 of them, can be attached to with joist hangers instead. How would this affect the strength of the house's exterior wall? That wall supports the intermediate floor at one end and the exterior wall for the upper floor but not any load from the roof trusses since they run in the same direction as the wall, perpendicular to the intermediate floor.
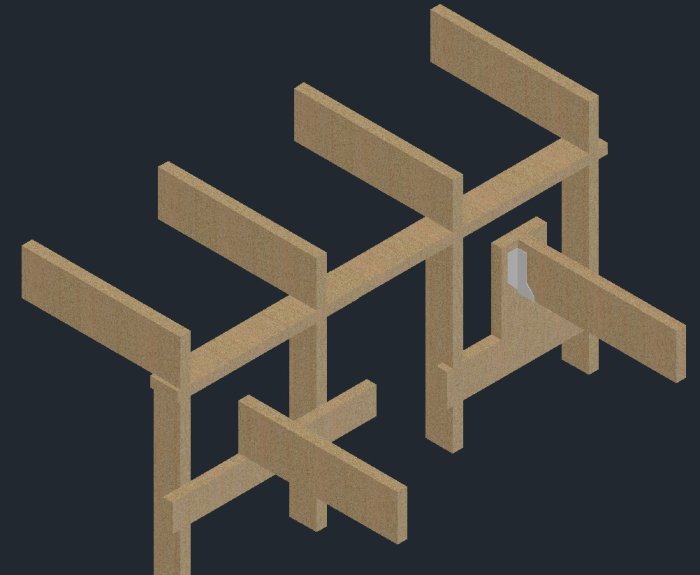
In the schematic below, the "house" is at the back and the garage at the front of the image. The beam closest shows the current principle, and the other section shows how I might be able to proceed.
Any comments from those of you who know about house construction?
Of course, you can insert a horizontal brace into the uprights. It also contributes to increased stability. However, I think it would be easier to place the insertion higher up and use a wider brace so that you can attach the beam shoe directly to it. The solution you have drawn seems a bit shaky.
The problem is that I can't access anything higher up since the wall and ceiling beams are already in place. The only way is from below between wall studs. However, I can have the standing part shorter with the horizontal part closer to the ceiling beam, drawn with greater distance for clarity. It will also not be a whole horizontal stud but shorter over a section at each ceiling beam since it's not possible to open all the way in one sweep.
In that case, I think the piece of timber you've drawn that holds the joist hanger should be rotated 90 degrees in the horizontal plane so that the garage roof beam can rest on it and it gains rigidity in the longitudinal direction of the garage beam. Instead, attach the rotated timber to the recessed one with a joist hanger.
I agree and understand your thought process, but...
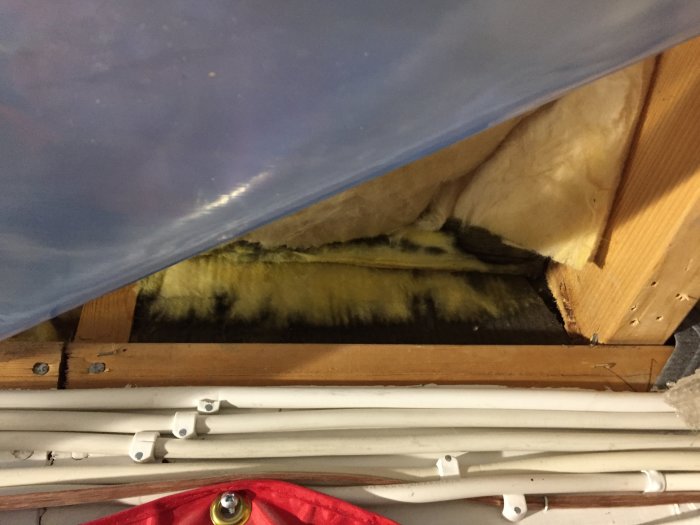
The garage roof beam ends flush with the outer side of the wall, so adding something under the beam results in the same as I have today, something protruding from the wall. A picture is worth a thousand words, roof beam on the right and wall stud on the left, never the twain shall meet, and the 120 rule laying with all the cables on...
Looking forward to removing all the cables going to the electrical panel behind the stud I want to remove.
If you do as you first drew, but attach the piece of timber holding the joist hanger with angle irons to the recessed joist so that it gains some stiffness in the longitudinal direction of the garage beam?
That was the thought I expressed in the first post. Even metal plates on the front and back should be achievable. This wall will have double gypsum, so in the worst case, you can carve out a bit in the innermost board at the metal plates or countersink the plates on the front of the stud; a sweep with the electric plane should suffice.
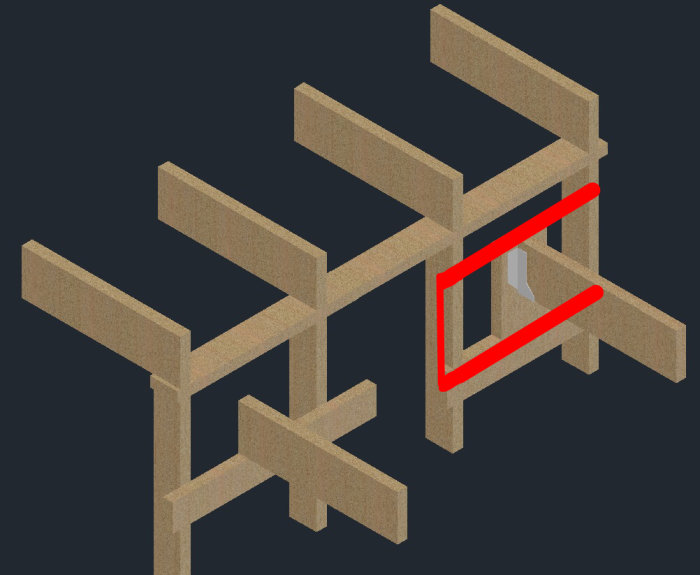
Is it not possible to access and unplug to insert a beefier piece of lumber? Tried to sketch simply but, cut along the thinner red line to fold from the lower thick line to the upper thick one. Maybe it doesn't work in practice?
Or can't you reach the right standing rule at all in the wall?
It falls on the fact that I cannot insert something from the side. To jack out and insert a beefier beam from below would require much more notching to be able to twist it in, and that notching would remove what the beef beam would rest on....
If you do as you first drew, but attach the piece of batten holding the joist hanger with angle brackets to the recessed batten so that it gets some stiffness in the garage beam's longitudinal direction?
Could also insert a short beam behind the piece with the joist hanger for increased stability in the roof beam's longitudinal direction.
Yes, it would, but you could quite easily support the "biffbalken" from underneath with a 195, 220, or whatever. The notch already exists, so it's "just" the first one that's tricky to get in place. Alternatively, insert standing 45x95 in the notches, a bit oversized but more stable and functional.
Or, just attach the biffbalken with angles above and below. No notches. Then provide it with shear support if you can access from behind or use a metal plate on the front side. This option doesn't involve any modifications to existing standing studs. Hard to explain and feels a bit tricky too.
Yes, it would, but you could quite easily support the "biffbalken" from underneath with a 195, 220, or whatever. The notch is already there, it’s just the first one that will be tricky to get in. Alternatively, place a standing 45x95 in the notches, a bit oversized but more stable and functional.
Or, just attach the biffbalken with angles over and from underneath. No notches. Then give it shear support if you can from the back, or a perforated metal plate on the front. This option doesn’t make any alterations to existing standing studs. Hard to explain and feels a bit tricky as well.
The latter is probably a feasible option, I've been too focused on recessing the support. Supporting with angles underneath is no problem, and with an angle adapter for the screwdriver, it should be possible to attach angles on the back side; there are at least 75 mm to work in, or just drive sturdy screws through the wall studs into the end grain of the biffbalken (I wonder when that word will appear in SAOL?).
Maybe it works with screws in the end grain too, yes. But it would certainly feel good to have some form of support behind it as well.
(Biffbalk; from the Latin biffius balkum)