
8,261 views ·
16 replies
8k views
16 replies
How to make curved handrails?
M
Marcussjogren
Member
· Västra Götaland
· 3 081 posts
Marcussjogren
Member
- Västra Götaland
- 3,081 posts
Hello!
I was checking out different gates and a question struck me.
How do you make a curved or bent crossbar with traditional craftsmanship?
It's clear that today you can take a laminated beam or some other composite material and just saw out what you need. But how did people do it in the past when these weren't available?
There are many such gates, and not everyone could possibly have had the knowledge and tools to bend such a substantial material.
So there are two ways left in my mind — either they found already bent logs/branches or they cut thick planks from a log and then sawed their crossbar out of that.
Do those of you with knowledge of traditional craftsmanship know of any other methods?
And while I have your attention, does anyone know of literature on the subject of "practical carpentry"? I'm not primarily thinking about how to make a very nice nightstand from some exotic material, but more how to quickly hew a post, how to make different notches and joints with coarser tools than a 10mm chisel, put together sawbucks, handle a carpenter's axe, replace an axe handle, and other forms of carpentry useful outdoors in the yard/garden.
Or maybe I'm grasping at too broad a topic?
I thought I'd assess the possibility and potential time investment to achieve something similar myself.
Attached are two examples of what I mean by the gates.
I was checking out different gates and a question struck me.
How do you make a curved or bent crossbar with traditional craftsmanship?
It's clear that today you can take a laminated beam or some other composite material and just saw out what you need. But how did people do it in the past when these weren't available?
There are many such gates, and not everyone could possibly have had the knowledge and tools to bend such a substantial material.
So there are two ways left in my mind — either they found already bent logs/branches or they cut thick planks from a log and then sawed their crossbar out of that.
Do those of you with knowledge of traditional craftsmanship know of any other methods?
And while I have your attention, does anyone know of literature on the subject of "practical carpentry"? I'm not primarily thinking about how to make a very nice nightstand from some exotic material, but more how to quickly hew a post, how to make different notches and joints with coarser tools than a 10mm chisel, put together sawbucks, handle a carpenter's axe, replace an axe handle, and other forms of carpentry useful outdoors in the yard/garden.
Or maybe I'm grasping at too broad a topic?
I thought I'd assess the possibility and potential time investment to achieve something similar myself.
Attached are two examples of what I mean by the gates.
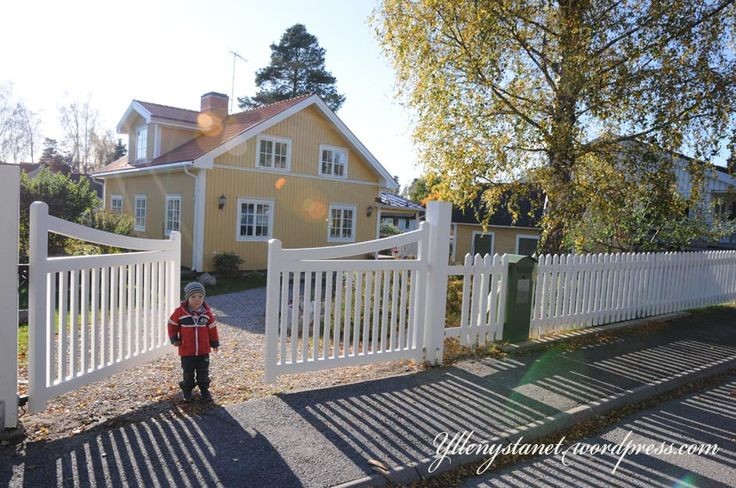
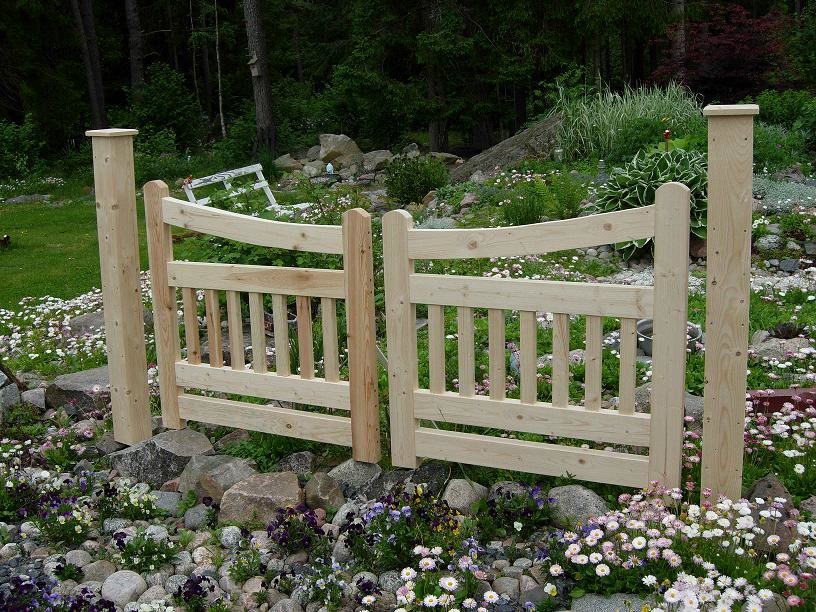
Last edited:

You are not fumbling!
The lower one looks like it is from the same material. So, one has jigsawed and then milled or planed the shape from a board.
Another way is to join several smaller pieces with a suitable joint (perhaps finger joint) and then jigsaw or mill the desired shape. Of course, it's important to have suitable hand tools or machines.
Unfortunately, I can't recommend any reading specifically on this.
The lower one looks like it is from the same material. So, one has jigsawed and then milled or planed the shape from a board.
Another way is to join several smaller pieces with a suitable joint (perhaps finger joint) and then jigsaw or mill the desired shape. Of course, it's important to have suitable hand tools or machines.
Unfortunately, I can't recommend any reading specifically on this.
M
Marcussjogren
Member
· Västra Götaland
· 3 081 posts
Marcussjogren
Member
- Västra Götaland
- 3,081 posts
Yes - but I have a gate today that is finger-jointed, I think it is maybe 7-8 years old. Completely rotten through - so you have to open it a little carefully ;-)
I am therefore quite convinced that material for outdoor use should be solid and planed to get the best possible longevity.
And of course maintained.
On the old gate at our place, it also looks like the paint has peeled off the most right where it is jointed.
I am therefore quite convinced that material for outdoor use should be solid and planed to get the best possible longevity.
And of course maintained.
On the old gate at our place, it also looks like the paint has peeled off the most right where it is jointed.

M
Marcussjogren
Member
· Västra Götaland
· 3 081 posts
Marcussjogren
Member
- Västra Götaland
- 3,081 posts
Yes, maybe it's more of an optical illusion. What if you want a higher turning radius then? I'll see if I can find an example, but Pippi Longstocking has one like thatuseless said:
The oldest way I can think of is to take a branch that has the right curve and dimension, split it in two halves (since you want a right and a left). Then you axe off what you don't want, i.e. the "backside" of the branch so it becomes flat.M Marcussjogren said:
A somewhat more modern method (from the 1400s-1500s onwards) is to saw them out of wider planks and this is still the most common method today. I recently made a series of similar constructions where I made a template with the correct shape, on which I fixed a piece and routed out the shape.
If it wasn't an outdoor construction but a piece of furniture, there are a couple of methods used, laminating - when thin sheets (veneer) are glued together on a mold.
And compression - a piece is pressed together under high pressure and steam along the grain so that the cell walls break, resulting in a floppy piece of wood that hardens as it dries.
The last method I can think of is wetting, but it's not very advisable to attempt with wood of that size. If you're going to wet upright pieces, you need a very strong mold to prevent them from deforming in the wrong direction, such as twisting, and a very strong press to bend with, several tons on such a short and thick piece.
No, it's better to take a larger plank and saw out the shape.
A common method is to have a plank that covers half of the shape, what you saw off from it is glued onto the opposite side and forms the other half of the shape.
Then you asked about literature... it sounds like what you're looking for is the most basic wood technology available? Stuff you learn in an afternoon by trying it yourself. That's my tip
Last edited:

N nilton61 said:
Now you've received the same tip twice Markussogrenremdrivet said:
M
Marcussjogren
Member
· Västra Götaland
· 3 081 posts
Marcussjogren
Member
- Västra Götaland
- 3,081 posts
Yes, my theory was a bit like that too – so we are pretty much in agreement on the approach.The oldest method I can think of is to take a branch that has the right bend and dimension, split this into two halves (you want a right and a left). Then axe off what should not remain, i.e., the "backside" of the branch so it becomes flat.
A slightly more modern method (1400-1500s and onward) is to saw them from wider planks, and this is still the most common today. I made a series of similar constructions recently where I made a template with the right shape, on which I fixed a material and used a router template to shape it.
If it wasn’t an outdoor construction but a piece of furniture, there are a couple of methods used, laminating - when thin sheets (veneer) are glued together on a mold.
And compression - a material is pressed together under high pressure and steam along its length so that the cell walls break; the result is a flimsy piece of wood that hardens when it dries.
The last method I can think of is steaming, but it’s not advisable to attempt with wood like that. If you're going to steam standing materials, you need a very strong mold so they don't distort in the wrong way, e.g., twist or similar, and a very strong press to bend with, several tons on such a short and sturdy piece.
No, it's better to take a larger plank and saw out the shape. A common method is that you have a plank that covers half the shape, what you saw off from it is glued on the opposite side and forms the other half of the shape.
Then you asked about literature... it sounds like what you're looking for is the most basic woodworking techniques there are? Stuff you can learn in an afternoon by trying yourself. That’s my tip
Then it's probably the case that one can achieve quite strong curves even out of a 220mm board; it's more likely an optical illusion making it look very sharp.
If you want it even sharper, nilton61's model is excellent!
This is exactly the kind of thing I want to learn – the craft itself doesn’t have to be difficult, and you can learn it easily in an afternoon.
Like axing out a post, which my 2-year-old daughter probably does quite well (alright) – but there are still a few things to consider. You need to rough-hew it, chalk line it, and then use the right axe.
If you just know those things, it goes like a dance, but it's precisely the techniques and ideas that I'm after
Someone who uses many clever solutions (in my opinion) is Frank Erichssen (100% farmer guy), whom I like to watch just for his woodworking skills.