82,430 views ·
16 replies
82k views
16 replies
mitering of moldings?!?!
I'm putting up crown molding, but I've encountered a problem. I'm using a type of molding called hålkälslist. I first measured the length, cut at 90 degrees, with a 45-degree miter cut, if you understand. But when two pieces need to be joined in a 90-degree corner in the ceiling, it doesn't match at all. Can someone tell me what miter angles should be used?????

45 degrees is correct, but you also need to place the molding correctly in the miter saw. Easier said than done...erknyq said:I am putting up ceiling molding, but have encountered a problem. I'm using so-called concave molding.
I first measured the length, cut at 90 degrees, with a 45-degree beveled edge, if you understand.
But when two moldings are to be joined in a 90-degree corner on the ceiling, it doesn't fit at all.
Can someone tell me which miter angles should be used?????
I have turned the moulding in the miter box, just as it should be in the ceiling. It is also the right length. But the moulding it meets cannot possibly be cut in the same way, because then it won't fit at all. Note that it is a concave moulding.
No, the meeting moulding should of course be cut 45 degrees in the "other direction" (-45 degrees). Concave moulding or not, it doesn't matter.erknyq said:
Take some small scraps and cut them at 45 degrees in different ways. Then hold them up and test until it fits right.
If it's a regular flat ceiling, they should be cut at 45 degrees - BUT - as cpalm says, it's not easy to get it right the first time. It's not enough for it to be cut in the right direction - you also need to place it "correctly" in the miter saw so that the cut is accurate.
If it's a regular flat ceiling, they should be cut at 45 degrees - BUT - as cpalm says, it's not easy to get it right the first time. It's not enough for it to be cut in the right direction - you also need to place it "correctly" in the miter saw so that the cut is accurate.
This is discussed in a thread that should be sticky: http://www.byggahus.se/forum/showthread.php?t=41103/0
I myself am putting up ceiling moldings made of some kind of polystyrene. I had no idea how to get them to fit in the corners! But then I found http://www.diydata.com/decorating/coving/cutting_cornice/cutting_coving.htm
and then it all made sense! Now I don't really know what hålkälslist is but the described technique worked perfectly for me. You just put the molding in a mitre box with the "wall side" of the molding against the side of the mitre box closest to you. The "ceiling side" of the molding lies against the bottom of the mitre box. Abracadabra, the angles were perfect! I hope my description was understandable.
Addition: I have now looked up what hålkälslist is and they resemble my moldings except for the material.
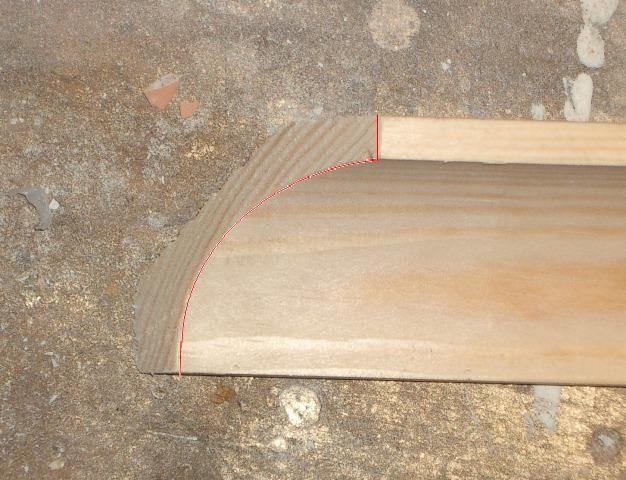
The easiest way to get the joints looking nice is to profile cut them with a jigsaw. First, cut some mitered test pieces so you're sawing in the right direction. Then miter the molding the "wrong way," after which you can saw with a jigsaw along the red line in the picture. It results in a 100% tight miter. Works perfectly for baseboards, etc.
Old thread perhaps... but many probably have issues with this.
I have posted some information on how to use a method to "craft" miters on ceiling moldings.
Also for broken ceilings and sloped ceilings.
The link is here:
http://hvilaro.blogspot.com/2008/07/gering-taklist.html
I have posted some information on how to use a method to "craft" miters on ceiling moldings.
Also for broken ceilings and sloped ceilings.
The link is here:
http://hvilaro.blogspot.com/2008/07/gering-taklist.html
syjwg: (Strange nickname but..") ) That's exactly how you do it, it's easier to carve one miter than two, but you haven't shown how to make an ending...
) That's exactly how you do it, it's easier to carve one miter than two, but you haven't shown how to make an ending...
That is, sometimes a wall may end, to meet a higher ceiling.....
I usually make a regular miter to the right, on a left wall... then a regular matching piece which is mitered... It creates a simple elegant finish....
) That's exactly how you do it, it's easier to carve one miter than two, but you haven't shown how to make an ending... That is, sometimes a wall may end, to meet a higher ceiling.....
I usually make a regular miter to the right, on a left wall... then a regular matching piece which is mitered... It creates a simple elegant finish....