94,018 views ·
46 replies
94k views
46 replies
Wide desk without legs (construction proposal)
I am figuring out how to construct our new desk and need your input. The idea is for the desk to be "floating," meaning the surface will only be anchored to the wall(s).
What makes it exciting is that the surface will span the entire width of the room, i.e., 3700mm. And preferably there won't be any support legs along the way. Just finding a surface (in one piece) with that width isn't easy. And it should preferably not weigh too much and not be too expensive. So there's really not much to choose from (that I know of). Right now, I'm leaning towards a solid laminated wood surface, like oak or mahogany available at Bahaus/K-Rauta. They can be had in dimensions of 30x630x3700 mm for under 3000kr.
Fine. According to my calculations, such a surface would weigh around 60-70kg. In addition, there will be a couple of computers, some monitors, and at least two pairs of elbows")
Regarding the hanging mechanism, I plan to place brackets on the short sides for the surface to rest against, and possibly a longitudinal bracket as well. To avoid sagging and to support in depth, I have sourced a couple of hefty brackets at 500x500 mm (lundbergs.com). I expect to need about 4-5 of these to keep the surface stiff. Since the surface is 630mm deep, there's 130mm that won't have "support."
The longitudinal wall and one of the short walls are brick = good fastening, while the other short side is plasterboard, and if I'm lucky, there’s a stud at the right height; otherwise, I'll have to open the wall and reinforce it.
What do you think about the construction? Is it sustainable? I don't know how to calculate the load. It doesn't need to handle an adult sitting on the surface, but possibly a small child climbing up How many "giant brackets" do you think are needed? Is it a problem that not the entire depth of the surface is supported? What else do I need to consider?
Thanks in advance!
What makes it exciting is that the surface will span the entire width of the room, i.e., 3700mm. And preferably there won't be any support legs along the way. Just finding a surface (in one piece) with that width isn't easy. And it should preferably not weigh too much and not be too expensive. So there's really not much to choose from (that I know of). Right now, I'm leaning towards a solid laminated wood surface, like oak or mahogany available at Bahaus/K-Rauta. They can be had in dimensions of 30x630x3700 mm for under 3000kr.
Fine. According to my calculations, such a surface would weigh around 60-70kg. In addition, there will be a couple of computers, some monitors, and at least two pairs of elbows
Regarding the hanging mechanism, I plan to place brackets on the short sides for the surface to rest against, and possibly a longitudinal bracket as well. To avoid sagging and to support in depth, I have sourced a couple of hefty brackets at 500x500 mm (lundbergs.com). I expect to need about 4-5 of these to keep the surface stiff. Since the surface is 630mm deep, there's 130mm that won't have "support."
The longitudinal wall and one of the short walls are brick = good fastening, while the other short side is plasterboard, and if I'm lucky, there’s a stud at the right height; otherwise, I'll have to open the wall and reinforce it.
What do you think about the construction? Is it sustainable? I don't know how to calculate the load. It doesn't need to handle an adult sitting on the surface, but possibly a small child climbing up
How many "giant brackets" do you think are needed? Is it a problem that not the entire depth of the surface is supported? What else do I need to consider?Thanks in advance!
I don't think the 130 mm has any practical significance. However, the longitudinal support is important. Open the plasterboard wall or install some suitable sheet material that has support against the floor, against the plasterboard wall. Perhaps you can cover it with the same wallpaper or equivalent that the wall already has. Start without a bracket and see how it feels. If it feels shaky, you can install a bracket in the middle, etc. Of course, you can calculate this with some FEM software, but it will be easier to try it out.
The challenging part of the project will be fitting the sheet against the walls, as you won't have any joints. I suggest using masonite to make templates. Then use the templates to transfer the saw line to your sheet material.
Google "scribing sheet material" and "scribing benchtop"
The challenging part of the project will be fitting the sheet against the walls, as you won't have any joints. I suggest using masonite to make templates. Then use the templates to transfer the saw line to your sheet material.
Google "scribing sheet material" and "scribing benchtop"
Hi Mattias! Thanks for your reply! The longitudinal wall is brick so there's no problem there. But after tests where we point-loaded our 50x50 brackets, neither the anchoring nor the brackets held up particularly well. So tomorrow we're going to try again with better screws/plugs and possibly a new approach. It might be a bit unfair to point-load a bracket, but you definitely want to feel that it can handle at least a little bit.
I've talked to a colleague who thought that a "frame around" would be enough, meaning solid joists on the back and short sides. But I think you need something to reinforce the "sway" = brackets.
I've googled scribing as you said but didn't find anything interesting... What does FEM program mean?
I've talked to a colleague who thought that a "frame around" would be enough, meaning solid joists on the back and short sides. But I think you need something to reinforce the "sway" = brackets.
I've googled scribing as you said but didn't find anything interesting... What does FEM program mean?
FEM=Finit element metod, eller Finite Element Method. A type of computational model, where the experimental space is divided into many small elements (meshing) and with gigantic systems of equations calculate what happens at the boundary (edges) of the elements. It can quickly become very complex.
Regarding Scribing:
http://www.doityourself.com/stry/betterfit
Regarding Scribing:
http://www.doityourself.com/stry/betterfit
On a related note, I'm posting here a description of how the legless desk turned out in the end.
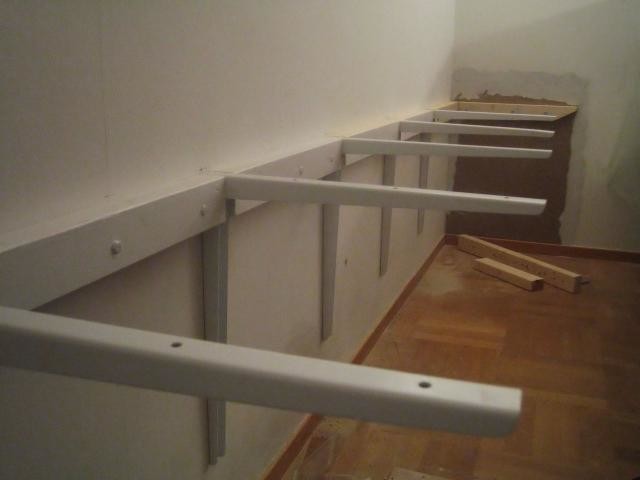
Along the wall, I built a frame from a 45 x 70 timber which I fastened with lag bolts that I slightly countersunk (not that it shows unless you're kneeling and vacuuming).
To "stiffen" the brackets (which turned out to give way under heavy point load (see previous post)), I divided the frame into parts, leaving space for a bracket between each section. On our 3.70m long wall, I installed 5 pieces of 50x50 brackets and 6 sections of the frame, all of which are positioned right next to the brackets. See attached image!
On the short sides, I installed a similar timber which I sawed stylishly so it didn't reach full height all the way to the board.
Since one of the walls was a drywall, I also had to open it up and reinforce it with an internal timber. The other walls are stone, so there it was fine.
Sturdy bolts, thick plugs, making it feel secure
I only attached the brackets to the wall using the top three holes, leaving the bottom hole empty.
The board procured at Bahaus was *exactly* as wide as the room - what are the odds? - and after some maneuvering, we got it in place.
Since the board spans from side to side in the room, I never had to anchor it in depth; it simply rests atop the brackets.
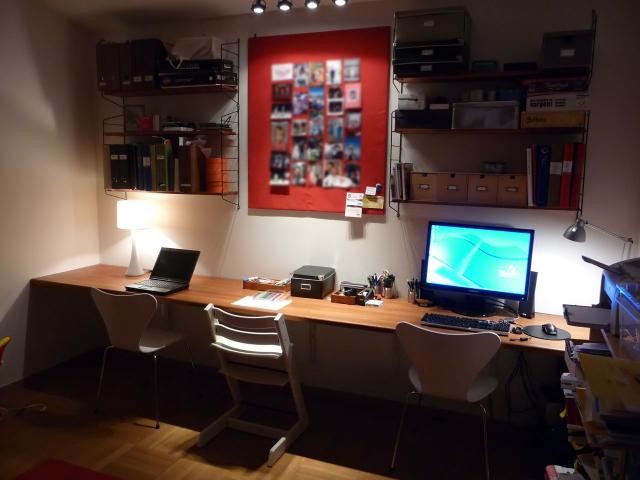
And as for durability? Well, an adult can't put their full weight on the board, but a child can easily stand and jump on it (though I'm trying to break them of this habit). Any weights on the desk, like monitors, computers, and books, are typically placed against the wall and not at the edge of the board, which minimizes stress at the outermost part of the board.
Overall, it feels like a reasonably robust construction. Not to mention how cool it is to have such a wide desk! The whole family can sit and tinker at the same time!
Along the wall, I built a frame from a 45 x 70 timber which I fastened with lag bolts that I slightly countersunk (not that it shows unless you're kneeling and vacuuming).
To "stiffen" the brackets (which turned out to give way under heavy point load (see previous post)), I divided the frame into parts, leaving space for a bracket between each section. On our 3.70m long wall, I installed 5 pieces of 50x50 brackets and 6 sections of the frame, all of which are positioned right next to the brackets. See attached image!
On the short sides, I installed a similar timber which I sawed stylishly so it didn't reach full height all the way to the board.
Since one of the walls was a drywall, I also had to open it up and reinforce it with an internal timber. The other walls are stone, so there it was fine.
Sturdy bolts, thick plugs, making it feel secure
I only attached the brackets to the wall using the top three holes, leaving the bottom hole empty.
The board procured at Bahaus was *exactly* as wide as the room - what are the odds? - and after some maneuvering, we got it in place.
Since the board spans from side to side in the room, I never had to anchor it in depth; it simply rests atop the brackets.
And as for durability? Well, an adult can't put their full weight on the board, but a child can easily stand and jump on it (though I'm trying to break them of this habit). Any weights on the desk, like monitors, computers, and books, are typically placed against the wall and not at the edge of the board, which minimizes stress at the outermost part of the board.
Overall, it feels like a reasonably robust construction. Not to mention how cool it is to have such a wide desk! The whole family can sit and tinker at the same time!

Nice desk! I’m working on the same idea and found this excellent thread. Our desk will be about 2 meters long and will cover a wall between a corner and a door frame. I was planning to place a bracket on each end and 2 in the middle (4 in total).
I have some questions regarding the frame you built:
If I understood correctly, was it to stabilize the brackets that were giving way?
Does the tabletop also rest on the frame?
Did you attach the brackets to the frame in any way, or do they just rest against it?
What screws and plugs did you use?
This is going to be a fun project. We’ll cover the entire short side of the room with shelves as well as this desk.
The edge was primarily intended to support the tabletop - along the walls, as the tabletop rests on the edge on three walls. But of course, if I apply point load far out, it's primarily the brackets that take the pressure, but also the side edge, I imagine (I'm a bit rusty on strength of materials)
Initially, I had planned to let the longitudinal edge run in one piece, but after point load testing a bracket (without tabletop), I got the idea that by breaking up the edge, I could support the brackets a bit better. I *think* it makes a difference, but I haven't measured and compared.
The brackets are not attached to the edge; they are just "clamped" in between.
To be on the safe side, I used fat screws and plugs. I found a couple of very nice orange plugs at Bauhaus that I have used. I don't remember the exact dimension, but I know the edge is attached with 8mm lag bolts, I'd guess they're about 8-10cm long as well (since they have to go through the material).
The brackets are attached with the same plugs, but "regular" screws, also with a diameter of 6-8mm and a length of about 7-8cm, I believe.
The key is to find stable brackets. However, most regular stores don't seem to have 50x50cm (or larger), so you have to search a bit.
Good luck! Feel free to post info and pictures from your project
Thanks for the quick response! I will definitely post pictures when it's done. We just need to paint the wall, buy materials, and then brace ourselves a little before we get started We bought an apartment that was renovated in the 90s, so we have a lot to do, but it's going to be nice.
We bought an apartment that was renovated in the 90s, so we have a lot to do, but it's going to be nice.Hello! Here are the promised pictures of our console shelf project and the crowning achievement, the console desk! It went well, although it was tricky to avoid all the electrical wires, especially since our meter that was supposed to detect electrical lines in the wall was completely inconsistent. THANK YOU Johram for all the help and all the tips! We bought the same brackets you used, and they seem to hold both the weight of the tabletop (we bought a countertop from IKEA), our computers, and a couple of elbows


http://www.flickr.com/photos/53685947@N04/4963341779/
http://www.flickr.com/photos/53685947@N04/4963341779/
Last edited:
Thank you! It is a hard concrete wall, so the screws are solid as a rock. We bought a rotary hammer specifically for this project, and it was well-invested money. It would have been rough to drill all 100 holes with our little hammer drill/screwdriver...
