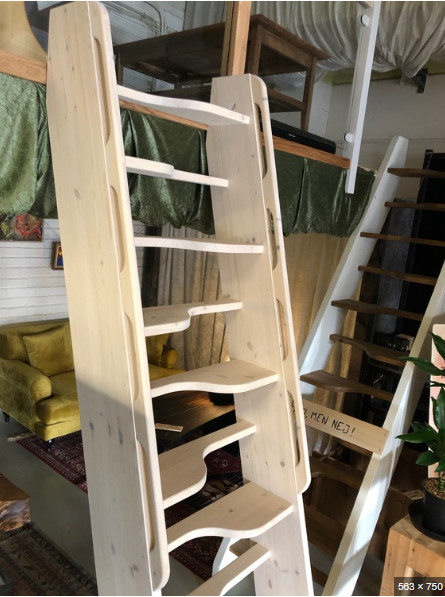
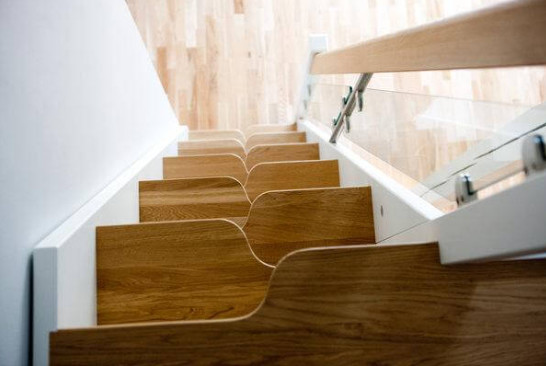
I have a staircase to a furnished attic that is very steep and the existing treads are too shallow to feel safe. My idea is to install new treads of the kind you often see on loft ladders or space-saving stairs (see pictures). That is, where one side of the step is deeper than the other.
Does anyone have a good idea on how I could manufacture these to make them as identical as possible? I have some hand tools and machines at my disposal and I might consider expanding my machinery if necessary, but I don't have access to or space for larger stationary machines.
One might instinctively think that it should be possible to achieve this with a jigsaw, but I'm unsure if I could get them as symmetrical as I want. If there was some sort of jig to work against, maybe it would be easier, but I don't know what such a jig might look like.
I'm also open to suggestions on materials. Here, shape stability and cost are priorities as I am likely to paint the front and cover the tread with some form of carpet.
You make a nice template from a hard, thin board. Trace it. Use a jigsaw/bandsaw a few mm outside the line. Then go over it with a router, bringing it right to the line, with the ball bearing supported against the template.
You make a fine template from a hard, thin board. Trace it. Use a jigsaw/bandsaw a few mm outside the line. Then go over with a router to precisely get to the line, with the ball bearing against the template.
27mm laminated shelf might work, or double 18mm.
Okay, so the router bit takes the entire depth then? I've never worked with a hand router but have been looking for a reason to buy one.
I have quite a bit of tools in Makita's 18V series, Would https://www.makita.se/product/drt50.html work or do you recommend something else? What accessories do I need?
Okay, so the router bit takes the entire depth then? I've never worked with a hand router but have been looking for a reason to buy one.
I have quite a few tools in Makita's 18V series. Would [link] work or do you recommend another one? What accessories do I need?
Not necessarily the entire depth. It can be done in a couple of passes.
Many YouTube woodworkers do that. Found this pretty sensible walkthrough. He has a router table, but it can be done with a hand router or trim router as well. At the end, it shows what the router bits look like, and how to solve it if the workpiece is thick.
Okay, so the router bit takes the full depth then? I've never worked with a handheld router but have been looking for a reason to buy one.
I have quite a lot of tools in Makita's 18V series, Would [link] work or do you recommend another one? What accessories do I need?
I would probably go with a corded one to work a bit faster without it getting too expensive. You need an edge-guiding bit, which is a straight bit with a bearing that can follow the template. If you cut close to the line, you can route everything in one go. Otherwise, you might need to take half the depth first, and then you might need different bits depending on how thick the template is (so the bearing doesn't fall off). Use the correct speed for the bit.
With cheap router bits, it's not uncommon for the bearings to break, and then you'll likely ruin the piece you're working on. Clean the bit often if you're working with softwood; it easily gets sticky with resin, making it dull. You can also hone straight bits.
A router is useful and makes jig saws and other rough saws viable for fine woodworking.
I would probably have brought a cord to be able to work a little faster without it getting too expensive. You need an edge milling bit, it’s a straight bit with a ball bearing that can follow the template. If you cut close to the line, you can mill everything in one go. Otherwise, you might need to take half the depth first, and then you may need different bits depending on how strong the template is (so the ball bearing doesn't go outside). Use the correct speed for the bit.
On cheap milling bits, it’s not uncommon for the ball bearing to break, then you're likely to ruin the piece you're working on. Clean the bit often if you're working with softwood, it easily gets gummed up with resin which makes it dull. You can also hone straight bits.
A mill is useful and makes jigsaws and other crude saws viable in fine carpentry.
This was put on the shelf for a while, but 18 months later I can happily report that I've completed the treads. I made a template in MDF and coarse-cut first with a jigsaw and ran the final bits with the mill the way you described. There were really no major issues once you got to test a little.
However, I have other projects that have been prioritized, so the treads are not installed yet, but any day now...
Edit: You mention "correct speed for the bit." How do I know which speed is correct? I experimented a bit when doing this, but if there is any rule of thumb, maybe that could be helpful next time.


Karrock said: