We are renovating a chimney for the installation of a stove. We are now trying to chip away "loosely attached plaster" around an old crack in the plaster.
But where do you draw the line for "loosely attached"? If you use enough force, you can detach everything.
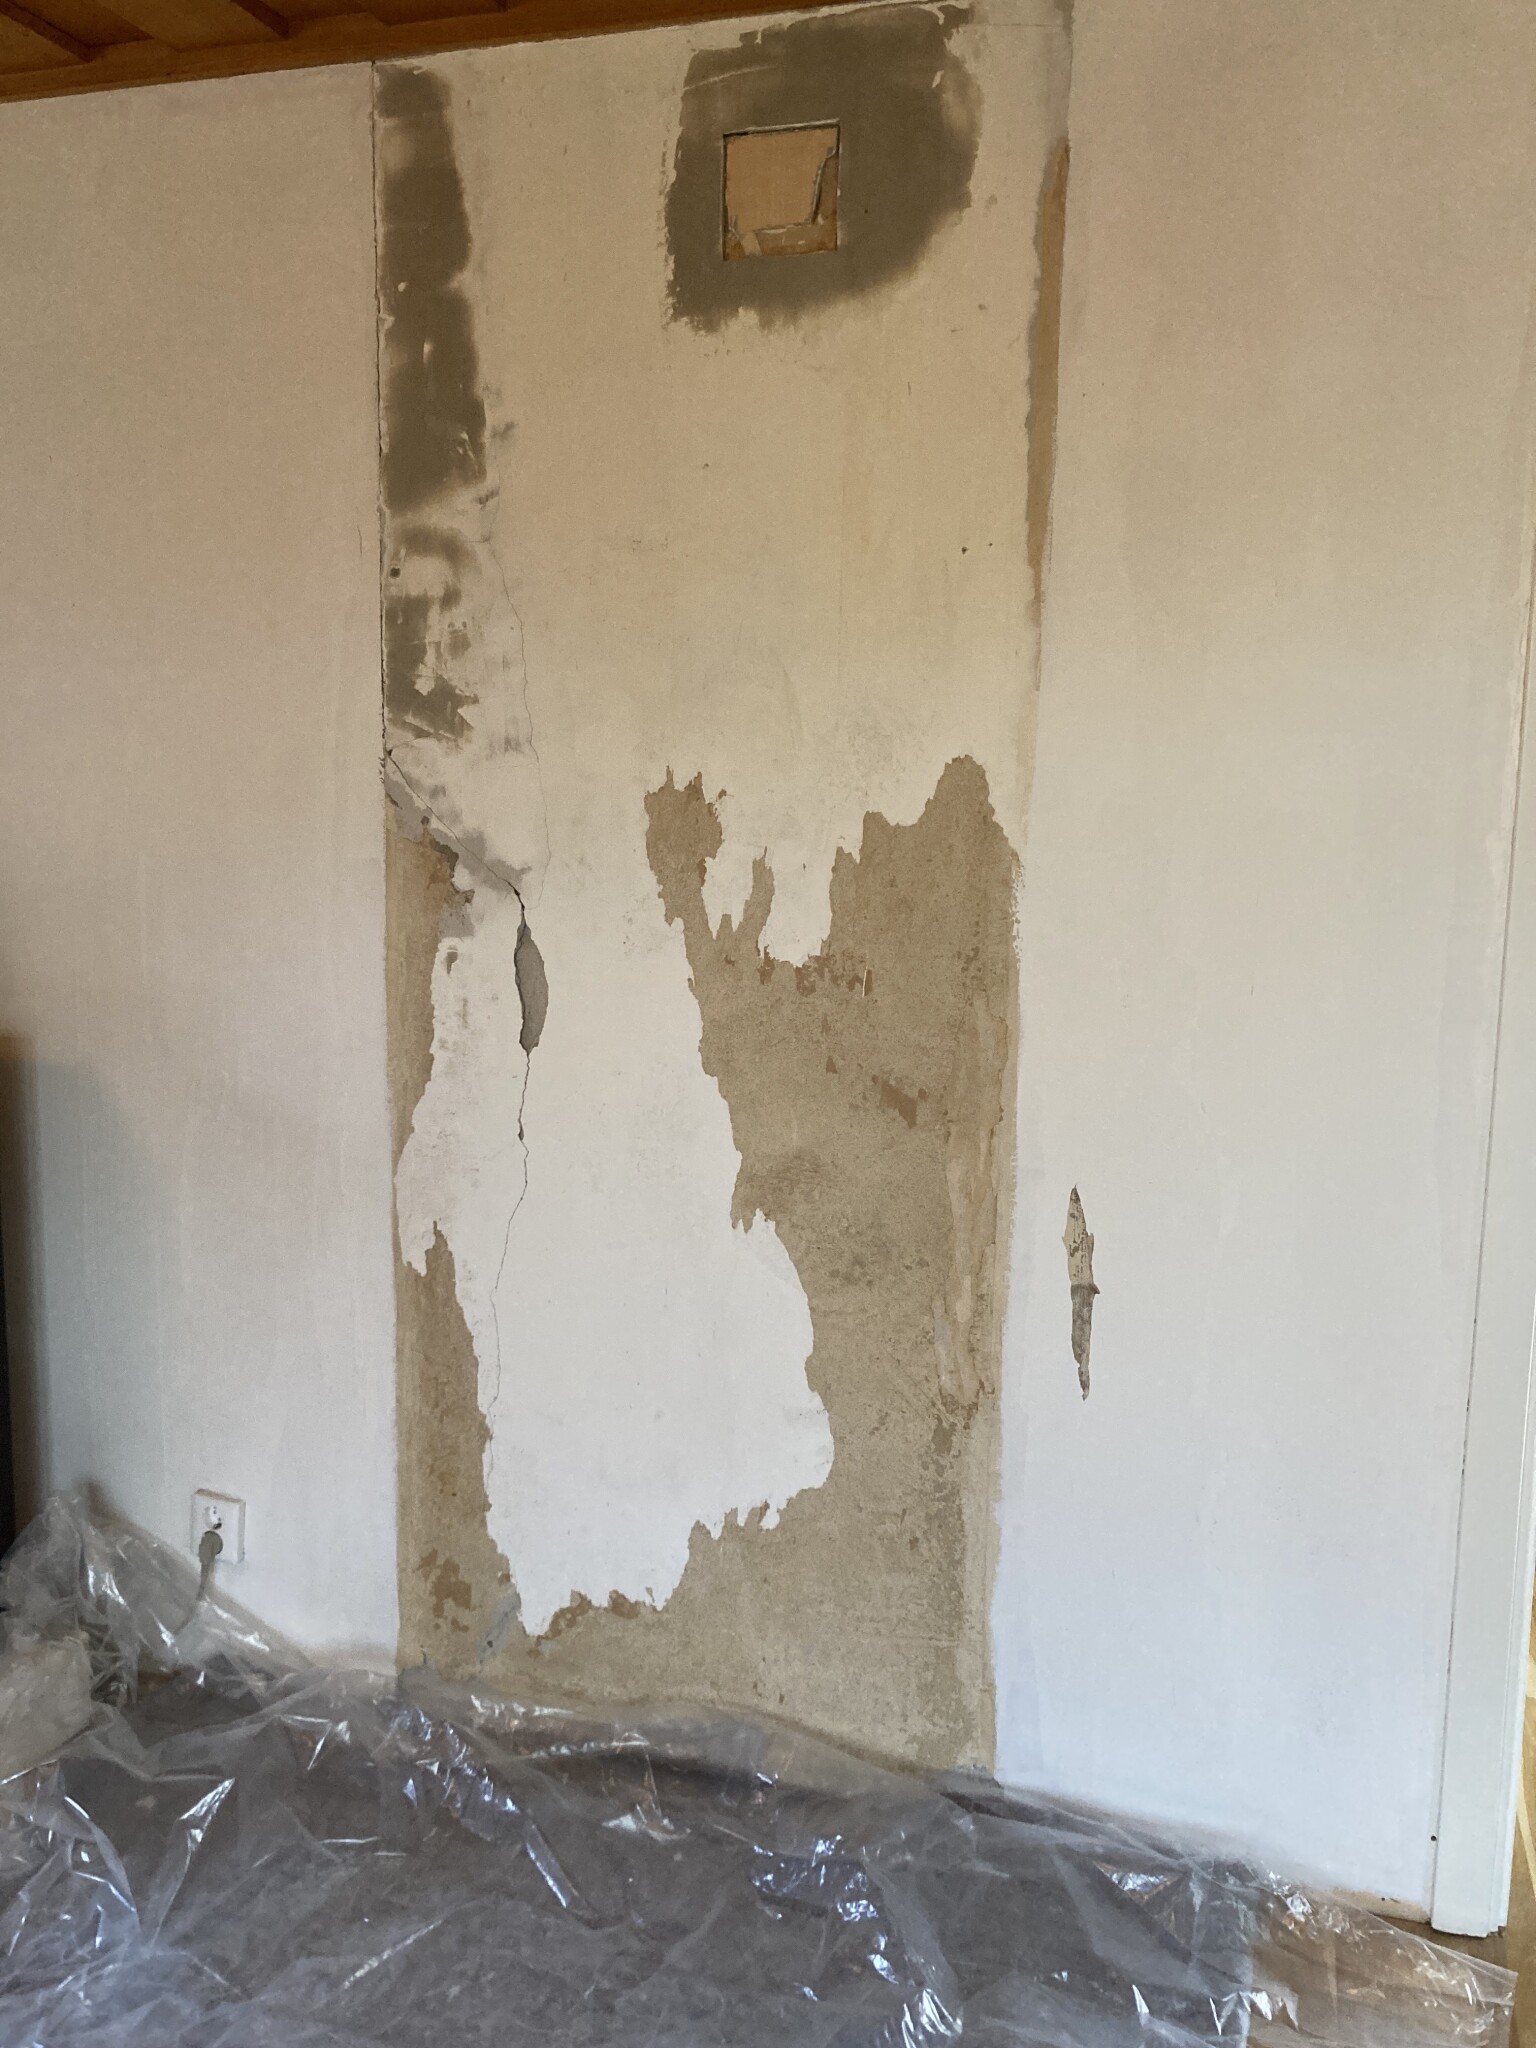
This is how it looks after we've chipped away what was just sand or came loose in large chunks because it was hollow behind. Is it still "loosely attached"?
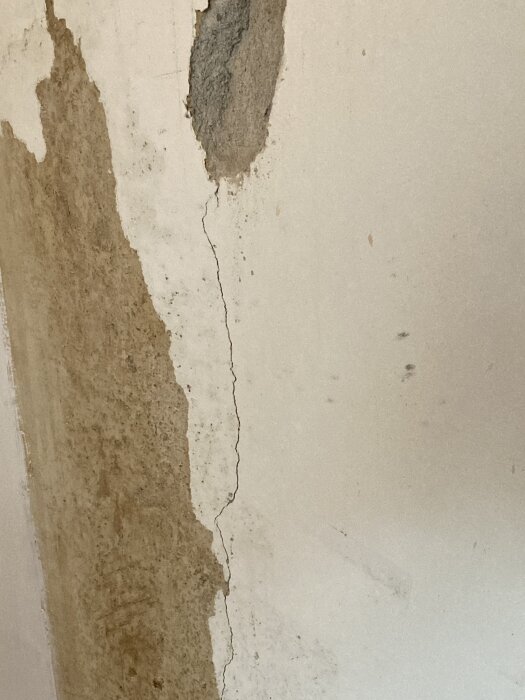
The crack looked like this before we brought out the hammer and crowbar:
We are renovating a chimney for the installation of a fireplace. We are now trying to knock away "loosely attached plaster" around an old crack in the plaster.
But where do you draw the line for "loosely attached"? If you use enough force, you can remove everything.
This is how it looks when we have removed what was just sand or came off in large chunks because it was hollow behind. Is it still "loosely attached"?
[video]
The crack looked like this before we used a hammer and crowbar:
[image]
When you tap on the plaster, you can hear if it's hollow or if it's solid, and if sand comes off the plaster when you drag the crowbar against it, it's not a problem.
Tap on the plaster with the handle of a screwdriver or similar. It should not be rubber-like but more like hard plastic. Anything that sounds hollow should be removed. If it sounds more solid, it's good and can stay.
When you tap on the plaster, you can hear if it's bomt or if it holds, and if there's sand coming from the plaster when you move the crowbar against it, there's nothing wrong.
Yes, it was very clearly bomt in certain areas, and the plaster ran out like sand when you made a hole in the thin surface layer there.
Tap on the plaster and listen if it sounds hollow. You should also use some finesse when removing hollow plaster. If you break it, there's a big risk you'll take a lot of plaster that could have stayed put. It's usually recommended to saw to disturb the healthy plaster as little as possible, but that might be especially important for larger sections.
Also, lime plaster is very soft - if you scrape with something hard, it's completely natural for it to turn to powder. Here, it's important to have a sense of what is healthy vs. deteriorated plaster. In my opinion, there is nothing wrong with the plaster in the film.
At the same time, plaster is relatively cheap, so it's better to remove a bit too much than too little if you want the best result.
Finally, use the right material for plastering. If it's lime plaster, repair with lime plaster and not with some "repair compound." And be meticulous with the work process - watering, priming, coating thickness, etc.
Knock on the plaster and listen if it sounds hollow. You also need to use some finesse when removing hollow plaster. If you use too much force, there's a big risk of removing a lot of plaster that could have stayed intact. It is usually recommended to use a saw to disturb the intact plaster as little as possible, but this is perhaps especially true for larger sections.
Lime plaster is very soft - if you scrape it with something hard, it's natural for it to become powdery. So, it's important to have a sense of what is intact vs. deteriorated plaster. In my opinion, the plaster in the video looks fine.
At the same time - plaster is relatively cheap, it's better to remove a bit too much than too little if you want the best result.
Finally, use the right material for plastering. If it’s lime plaster - repair with lime plaster and not some "repair mortar". And be meticulous with the work process - wetting, priming, thickness of the layers, etc.
Thanks!
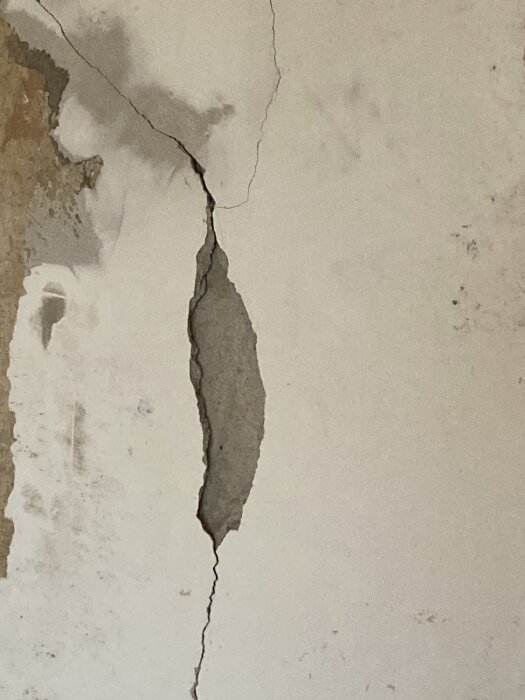
There's a thin crack that doesn't sound hollow on either side. Should I remove a bit around it anyway to be able to plaster again?
There is a thin crack that doesn't sound hollow on either side. Should I remove some around it anyway to be able to plaster it again?
I try to advise you in ways that the average person can handle. If you're a mason, you don't always need to use an angle grinder; you can also chip and scrape up cracks, but that requires a bit of skill.
There is a thin crack that doesn't make a sound on either side. Should I remove some around it anyway to be able to plaster it again?
Yes, exactly right - if you want to fix a crack, you need to widen it so you can plaster into it.
We saw open cracks with a small angle grinder and diamond disc into a V-shape. But if the crack is only a few centimeters from another crack or edge, it's not worth doing; instead, you remove the whole piece. Then we do the first application with hydraulic mortar that is worked into the bottom of the crack and then the required number of 1 cm applications with air-hardening mortar.
In your case, you might opt for hydraulic all through, but personally, I find it a bit too "brittle".
Also remember to remove wallpaper, etc., down to the plaster a couple of decimeters around so that you can plaster edge to edge with the old plaster.
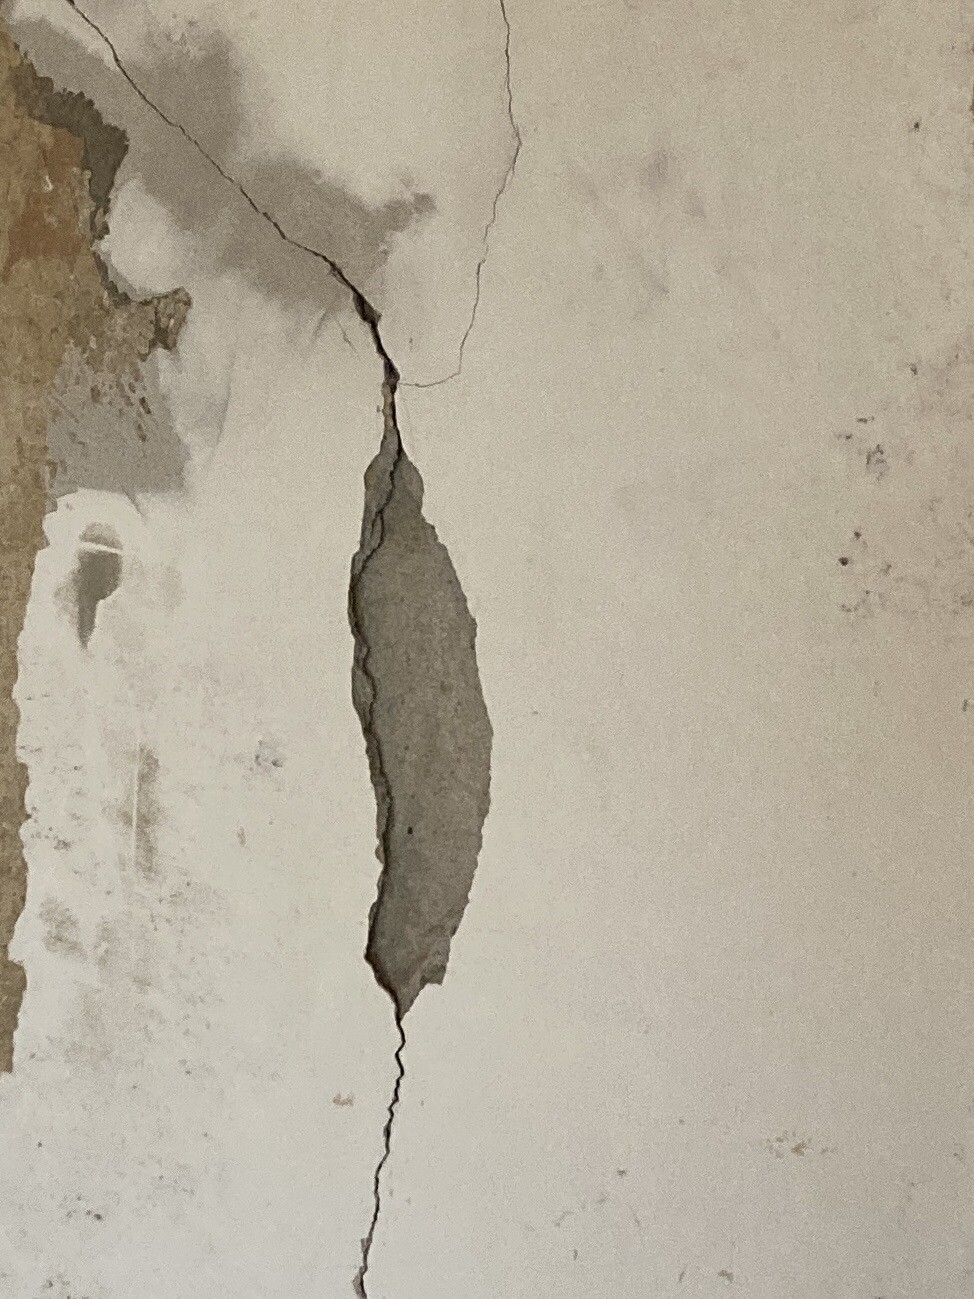
This is how it looks after we removed everything that was sand or clearly bomt. Cracks ran a bit here and there in what we removed. It seems to be an old repair, maybe with some other plaster. That's probably why it cracked.
The crack continues down into the original plaster, and this is where we are considering whether to open it up a bit to repair the crack. Possibly, there is a bit of bomt to the right of the crack, but it doesn't come off easily just by poking a bit like it did further up.
We hope that the thin layer of rock-hard white filler (gypsum filler?) is okay to have behind a stove, otherwise, it will be a hassle.
Here's how it looks after we removed everything that was sand or clearly loose. There were cracks running in various directions in what we removed. It seems to be an old repair, possibly with some other plaster. That's probably why it cracked.
The reason it cracks is that it's at the edge of the chimney where it meets the wall, which moves differently than the chimney. It's probably almost impossible to plaster over that transition and avoid it cracking again eventually. Lime plaster can handle some movement in the substrate, but not an unlimited amount.
Then you can wonder why it hasn't just resulted in a small crack, but has become loose over such a wide section. I think that indicates the movement is such that the plaster is sheared or broken off at the edge. Does it look like there's quite a wide gap there?
A few alternatives I imagine:
1. Restore according to the existing solution and just plaster again without special measures. It will crack again eventually, but that's something you have to live with.
2. Place a plaster mesh a couple of decimeters in on each side to reinforce the transition wall-chimney. It might be enough to avoid cracking, it might not.
3. Create a small movement joint in the transition so they can move individually.
You can also reinforce the surface layer by, for example, embedding a wide strip of smooth fiberglass mesh to prevent the crack from showing.
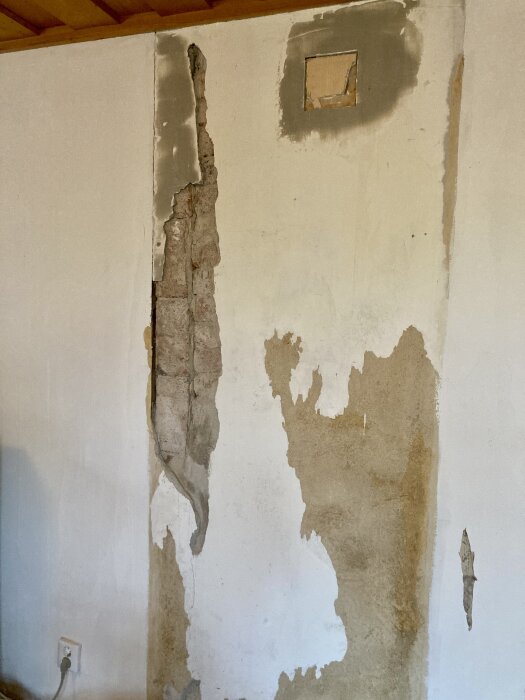
When we moved in, the chimney was also wallpapered, and there were wrinkles in the wallpaper at the transition between the chimney and the wall on one side, so it's clear that it has moved. The house is from the 1930s and previously had an oil furnace, and before that, it likely had stoves.
Here is an overview from before we started knocking down loose plaster. Long crack from top to bottom in the plaster. The upper part of the left edge has a visible gap between the chimney and the wall. The lower part and the entire right side are reinforced and filled with joint compound (?), and you can't even see the transition there. The chimney is "spotty" because at some point, white filler was applied without removing all the wallpaper remnants first. Some of the filler was therefore loose and was removed when we tore down all the loose wallpaper in the room. The gray patches further up are gray filler on top of the white. Patched and repaired on more than one occasion.
We expect that it will move again, but we hope that any new cracks will appear at the joint between the chimney and the wall instead of in the middle of the plaster.
The rest of the wall will also be renovated eventually. So far, we've only removed wallpaper and primed with wallpaper primer. The "stain" on the right side of the image is from wallpaper that came off after we painted.
Vi vill skicka notiser för ämnen du bevakar och händelser som berör dig.
mrsnhp said:
We are renovating a chimney for the installation of a fireplace. We are now trying to knock away "loosely attached plaster" around an old crack in the plaster.Appendix said: